
How to set up a WordPress website, is easy just start by choosing the right WordPress option, then get a domain name and hosting. Next, install WordPress, adjust your site settings, pick a theme, create your main pages, add important plugins, set up backups and security, and test your site before launching. For most beginners, it’s easier to use your host’s WordPress installer rather than doing everything by hand.
It might seem like a lot, but it’s not difficult-just easy to mix up the order. A common mistake is thinking that installing WordPress means your website is finished. The installation only gives you access to the dashboard. The real work is in setting up your site so people can visit, trust, and use it.
This guide explains each step in simple, easy-to-understand language.
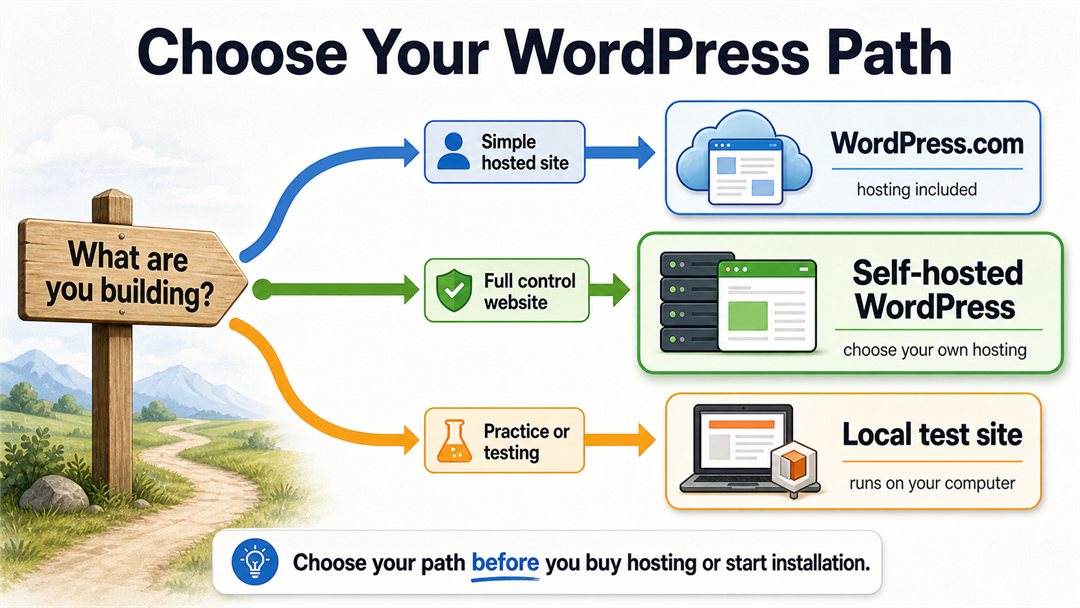
Before You Start: Choose the Right WordPress Path
There are two common ways people mean “WordPress”:
| Option | What It Means | Best For | Main Trade-Off |
|---|---|---|---|
| WordPress.org | Free open-source WordPress software installed on your own hosting | More control, custom sites, business websites, plugin/theme flexibility | You manage hosting, updates, backups, and maintenance |
| WordPress.com | A hosted website service that runs on WordPress | Simpler setup, less technical maintenance, personal sites | Some customization and plugin features depend on the plan |
If you are still choosing between them, start with WordPress.com vs WordPress.org. That decision affects hosting, cost, plugins, customization, and long-term control.
For this tutorial, the main path is self-hosted WordPress, meaning WordPress.org software installed on a web hosting account. That is the version most people mean when they talk about owning and customizing a WordPress website.
If you are brand new and want the broader context first, read what WordPress is before you start clicking through hosting dashboards.
What You Need to Set Up a WordPress Website
For a normal public website, you need four things:
- A domain name: the address people type, such as
example.com. - Web hosting: the server space where WordPress runs.
- WordPress software: the content management system installed on your hosting account.
- A basic site plan: the pages, design direction, and features your website needs.
WordPress itself is free open-source software, but a real website usually has costs such as hosting, domain registration, premium themes, premium plugins, or professional help. For a full breakdown, see whether WordPress is free.
Step 1: Decide What the Website Needs to Do
Before you buy anything, write one sentence that describes the job of your website:
- “This website should help local customers request a quote.”
- “This website should publish tutorials and collect email subscribers.”
- “This website should sell a small catalog of products.”
- “This website should show my portfolio and make it easy to contact me.”
This one sentence will help guide all your setup choices. For example, a brochure site needs different pages than an online store. A blog needs categories and a way to organize posts. A service business needs to show trust, offer contact options, and include location details.
You don’t need a full brand strategy right now. You just need enough direction to avoid picking random themes and plugins that seem interesting at first glance.
Step 2: Choose a Domain Name and Hosting
Your domain and hosting are the base of your website. If either one is confusing or not set up well, the rest of the process will be more difficult.
For the domain name, keep it:
- Short enough to say out loud.
- Easy to spell.
- Close to your brand, business name, or topic.
- Free of confusing hyphens or numbers unless they are part of the brand.
For hosting, choose a plan that supports modern WordPress requirements. WordPress.org currently recommends hosts support PHP 8.3 or greater, MySQL 8.0+ or MariaDB 10.11+, and HTTPS through SSL/TLS encryption. You can verify the current baseline on the official WordPress requirements page.
If those terms sound unfamiliar, don’t worry. On a typical beginner hosting plan, you won’t need to manage PHP or MySQL yourself. Just make sure you pick a host that keeps these server tools up to date.
Beginner Hosting Checklist
Look for hosting that includes:
- One-click or guided WordPress installation.
- Free SSL certificate support.
- Automatic backups or easy backup tools.
- A clear control panel.
- Staging support if you expect to make larger changes later.
- Support that understands WordPress, not just generic hosting.
- Enough room to grow without pushing you into an expensive plan immediately.
If you want a deeper buying guide before choosing, use best hosting for WordPress as your next step.
Step 3: Install WordPress
Most beginners should install WordPress through their hosting dashboard. The exact labels vary by host, but the flow is usually similar:
- Log in to your hosting account.
- Open the Websites, Hosting, Apps, or WordPress section.
- Choose “Add site,” “Install WordPress,” or a similar option.
- Select the domain name.
- Enter the site title.
- Create your WordPress administrator username, password, and email.
- Start the installation.
- Open the WordPress dashboard at
yourdomain.com/wp-admin/.
Choose a unique admin username instead of just admin, and save your password in a password manager. Remember, your hosting account and your WordPress admin account might have different logins, so keep track of both.
The official WordPress installation documentation also explains the manual method: download WordPress, create a database, configure wp-config.php, upload the files, and run the installer in the browser. That path is useful for developers and unusual hosting setups, but it is more than most first-time site owners need. You can compare both paths in the How to Install WordPress guide.
Step 4: Complete the First WordPress Settings
After you log in to wp-admin, take a few minutes to review your settings. Doing this now can help you avoid annoying fixes later.
In the WordPress dashboard, check:
- Site title and tagline: Go to Settings -> General and make sure the name matches your brand.
- Admin email: Use an inbox you actually monitor.
- Timezone: Set the correct timezone so scheduled posts and form timestamps make sense.
- Permalinks: Go to Settings -> Permalinks and choose a readable structure, often “Post name” for most content sites.
- Search engine visibility: In Settings -> Reading, leave “Discourage search engines” unchecked when the site is ready to be indexed. Keep it checked only if you are intentionally hiding a work-in-progress site.
- Homepage display: Decide whether the homepage should show a static page or your latest blog posts.
These settings may seem small, but they affect how your website’s links, homepage, and publishing process work.
Step 5: Choose a Theme and Basic Design Direction
A WordPress theme sets up your site’s design, including layout, fonts, colors, templates, and overall style. It won’t replace your content, and you shouldn’t pick a theme just because its demo looks impressive.
Choose a theme that fits the website’s job. A local service business may need clear calls to action and location sections. A blog needs readable post templates. A portfolio needs strong project layouts. An online store needs WooCommerce support.
When reviewing themes, look for:
- Recent updates.
- Good reviews from real users.
- Responsive mobile design.
- Compatibility with the block editor.
- Clean documentation.
- Only the features you will actually use.
Try not to install lots of large themes or page builders just to experiment on your live site. If you want to understand the moving parts first, read how WordPress themes and plugins work.
Step 6: Create the Essential Pages
Most new WordPress websites need a few core pages before launch. Start simple:
| Page | Purpose | Beginner Tip |
|---|---|---|
| Home | Explains who the site is for and what to do next | Make the main action obvious |
| About | Builds trust and context | Keep it specific, not generic |
| Contact | Gives visitors a way to reach you | Test the form before launch |
| Services or Products | Explains what you offer | Use plain labels visitors recognize |
| Blog or Resources | Holds articles, updates, or guides | Create only if you plan to publish |
| Privacy Policy | Explains data collection and tracking | Required for many sites using forms, analytics, or ads |
Don’t wait until every word is perfect. You can launch your site with clear, basic pages and improve them as you find out what your visitors need.
Step 7: Set Up Navigation
Navigation is how visitors understand your site. In WordPress, you may manage menus through Appearance, the Site Editor, or the Navigation block depending on your theme.
Keep the first menu short. A beginner website usually needs:
- Home
- About
- Services, Products, or Blog
- Contact
If you have too many pages for your main menu, group them under clear labels. Avoid using clever names that might confuse visitors. For example, Services is usually clearer than What We Do, and Contact is better than Start the Conversation when someone is looking for your contact page.
Step 8: Add Only the Plugins You Actually Need
Plugins add functionality to WordPress. They can handle contact forms, SEO fields, backups, caching, security, ecommerce, memberships, analytics, and thousands of other features.
The key is to use only what you need. A new site doesn’t need twenty plugins right away.
Start with categories:
- Backup plugin or host-level backups so you can restore the site if something breaks.
- Security plugin or host security tools for basic hardening and alerts.
- SEO plugin for titles, meta descriptions, XML sitemaps, and search settings.
- Form plugin if visitors need to contact you.
- Caching or performance plugin if your host does not already handle caching well.
- Analytics connection so you can understand traffic after launch.
Before installing a plugin, check its update history, reviews, support activity, compatibility notes, and whether the feature already exists in your theme or hosting plan.
Step 9: Set Up Backups, Security, and Updates
This is the part beginners often skip because the site seems to “work.” Do not skip it.
At minimum:
- Turn on automatic backups or install a backup solution.
- Confirm you know how to restore a backup.
- Use strong passwords for every admin account.
- Remove unused themes and plugins.
- Keep WordPress core, themes, and plugins updated.
- Use HTTPS on the whole site.
- Limit admin users to people who truly need access.
Security isn’t just a single setting. It’s a set of habits that help lower your risk. No plugin or host can guarantee your website will never be attacked, but regular maintenance can prevent many common problems.
Step 10: Check SEO, Analytics, and Performance Basics
You do not need an advanced SEO campaign before launching a small WordPress site. You do need the basics in place.
Check that:
- Your homepage has a clear title and description.
- Important pages have descriptive titles.
- Your permalink structure is readable.
- Your site is not accidentally blocking search engines.
- Images have meaningful alt text when the image adds information.
- You have connected analytics or another privacy-appropriate measurement tool.
- Your site loads reasonably well on mobile.
How well your site performs depends on your hosting, theme quality, plugins, image sizes, caching, and how you build your pages. Try to keep your site simple at first. It’s much easier to improve a lightweight site than one that’s already cluttered.
Step 11: Test the Website Before Launch
Before you share your site with others, go through it as if you’re a first-time visitor.
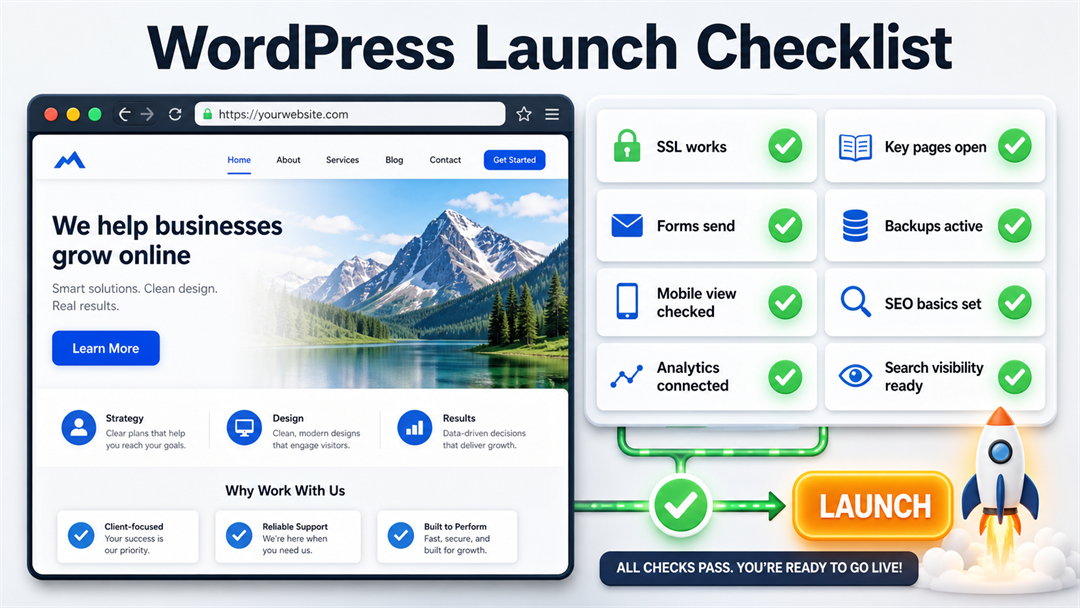
Use this launch checklist:
- Visit the homepage on desktop and mobile.
- Click every main navigation link.
- Submit each contact form and confirm the email arrives.
- Check that HTTPS works, and the browser does not show a security warning.
- Open key pages in a private browser window.
- Test your main call-to-action button.
- Read the footer for outdated placeholder text.
- Confirm your privacy policy is linked if you collect personal information.
- Check that backups are active.
- Make sure search engine visibility is set the way you intend.
Common WordPress Setup Mistakes to Avoid
Most setup mistakes aren’t dramatic. They’re usually small choices that lead to extra work later on.
Avoid these:
- Choosing WordPress.com when you actually need self-hosted plugin and theme control.
- Buying hosting before understanding your website goal.
- Using
adminas the administrator username. - Installing too many plugins before the site has real needs.
- Keeping demo content live.
- Forgetting to test contact forms.
- Leaving the site hidden from search engines after launch.
- Using huge uncompressed images on important pages.
- Assuming backups work without testing restore access.
- Customizing a complex theme before writing clear page content.
A simple, well-organized setup is usually better than a flashy one. Focus on getting the basics right first. You can add extra touches after your site is up and running.
FAQ
Can I set up a WordPress website without coding?
Yes. Most beginners can set up a WordPress website without coding by using a hosting dashboard installer, a block-compatible theme, and carefully chosen plugins. Coding becomes useful for custom design, advanced functionality, performance work, or deeper troubleshooting.
How long does it take to set up a WordPress website?
A basic WordPress installation can take only a few minutes through a hosting dashboard, but a usable website usually takes longer. Plan time for pages, navigation, theme settings, forms, backups, SEO basics, and testing.
Do I need hosting for WordPress?
You need hosting for self-hosted WordPress.org. WordPress.com includes hosting as part of the hosted service. That is why the WordPress.com vs WordPress.org decision should come before buying a hosting plan.
Should I use a free or premium WordPress theme?
A free theme can be enough for a simple website if it is well maintained, responsive, and compatible with the block editor. A premium theme may be worth it when you need better templates, support, or design controls, but it is not automatically better.
What should I do immediately after installing WordPress?
After installing WordPress, check your site title, admin email, timezone, permalink structure, homepage setting, search visibility setting, theme, essential pages, backups, security basics, and contact forms. Those steps turn a raw installation into a launch-ready website.
Final Takeaway
Setting up a WordPress website isn’t just about clicking an install button. It’s about following a clear sequence: choose the right WordPress option, set a clear goal, pick good hosting, install WordPress, set up the basics, create the pages your visitors need, protect your site, and test everything before you launch.
If you want to go beyond the basics, the next step is learning about WordPress development. This includes working with themes, plugins, performance, security, maintenance, and custom features to make your site fit your project’s needs.