
How to install WordPress? The easiest way to install is to use the WordPress installer inside your web hosting account. Most beginner-friendly hosts include a one-click or guided installer that creates the WordPress files, database, admin account, and login page for you.
If your host does not include an installer, you can still install WordPress manually by downloading WordPress from WordPress.org, creating a database, uploading the files, and running the install script in your browser.
This guide walks through both paths, plus a local installation option for practice or development.
Quick Answer: The Easiest Way to Install WordPress
For most beginners, the best path is:
- Buy or connect a domain name.
- Choose web hosting that supports WordPress.
- Open your hosting dashboard.
- Select the WordPress installer.
- Enter your site title, admin email, username, and password.
- Choose your domain or installation location.
- Finish the installation.
- Log in at
yourdomain.com/wp-admin.
That is the practical version of installing WordPress. The host handles the technical parts in the background.
Manual installation is still useful if you are setting up WordPress on your own server, moving files yourself, learning how WordPress works, or working in an environment where no installer is available.
If you are still deciding which version of WordPress you need, pause here for one important distinction: this article is about installing self-hosted WordPress from WordPress.org. WordPress.com is a hosted service, so you create an account and site there instead of manually installing the software. Our guide to WordPress.com vs WordPress.org explains the difference in plain English.
Before You Install WordPress
WordPress is flexible, but it still needs the right foundation. Before you start clicking install buttons, make sure you have the basics ready.
What You Need
| Requirement | What It Means |
|---|---|
| Domain name | The address people type to visit your site, such as example.com |
| Web hosting | The server space where your WordPress website files and database live |
| HTTPS/SSL | The secure connection that lets your site load with https:// |
| Admin email | The email address used for password resets and important site notices |
| Strong admin login | A unique username and password for your WordPress dashboard |
| Site title | The name of your website, which you can change later |
According to the official WordPress.org requirements, the recommended modern baseline is PHP 8.3 or greater, MariaDB 10.11+ or MySQL 8.0+, and HTTPS. WordPress can run on some older server versions, but older software can create performance and security problems, so it is better to start with a host that meets the current recommendations.
If terms like hosting, themes, plugins, and dashboard still feel a little fuzzy, start with our beginner explanation of what WordPress is. The installation steps make more sense once you know what WordPress is doing behind the scenes.
Root Domain, Subdomain, or Subdirectory?
You also need to decide where WordPress should live.
| Install Location | Example | Best For |
|---|---|---|
| Root domain | example.com | Your main website |
| Subdomain | blog.example.com | A separate section or project |
| Subdirectory | example.com/blog | A blog or section inside an existing site |
| Local computer | localhost or a local app URL | Practice, testing, or development |
If this is your main website, install WordPress on the root domain. If you are adding a blog to an existing site, a subdirectory may make more sense. If you are learning, testing, or building privately, use a local install.
Do not install multiple WordPress sites into the same folder. cPanel’s current documentation warns that multiple WordPress installations should not share one document root because conflicts can cause problems with files such as .htaccess.
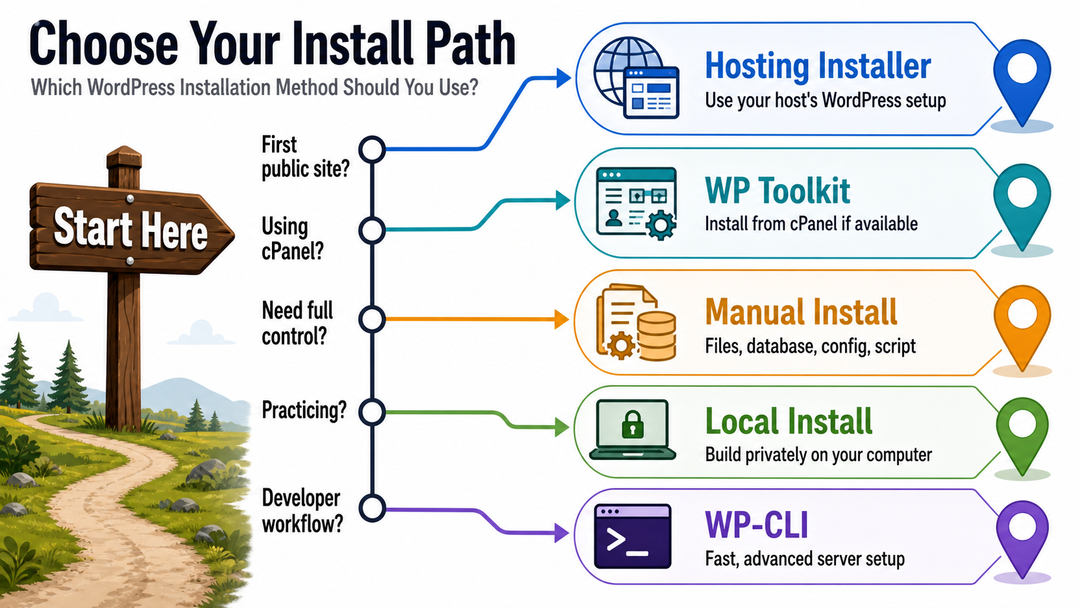
Which WordPress Installation Method Should You Use?
The right method depends on what you are trying to do.
| Method | Best For | Difficulty | Main Trade-Off |
|---|---|---|---|
| Hosting auto-installer | Most beginners and business websites | Easy | Steps vary by host |
| cPanel WP Toolkit | Sites using cPanel hosting | Easy to moderate | Depends on whether your host enables WP Toolkit |
| Manual FTP/SFTP install | Custom hosting or learning the full process | Moderate | You must handle files, database, and configuration |
| Local install | Practice or development on your computer | Easy to moderate | The site is not public until you migrate it |
| WP-CLI install | Developers and server admins | Advanced | Requires command-line comfort |
If you are building your first public website, use your host’s WordPress installer. It is faster, less error-prone, and usually sets up the database for you.
Use the manual method only when your host does not provide an installer, you need a specific setup, or you want to understand the full WordPress installation process.
Method 1: Install WordPress With Your Hosting Provider
Most hosting dashboards have a WordPress option somewhere under names like WordPress, Website Installer, Auto Installer, Softaculous, Install Applications, or WP Toolkit.
The labels change from host to host, but the basic flow is similar.
Step 1: Open Your Hosting Dashboard
Log in to your hosting account and find the section for websites, domains, or applications. Look for a WordPress install option.
If your hosting account is brand new, the host may ask whether you want to create a new website, migrate an existing website, or connect a domain first.
Choose the option to create a new WordPress website.
Step 2: Choose the Domain
Select the domain where you want WordPress installed.
Check this carefully. If you install WordPress on the wrong domain, subdomain, or folder, your site may appear in the wrong place.
For a main website, choose the root domain:
“text example.com “
For a blog section, you might choose:
“text example.com/blog “
For a separate project, you might choose:
“text project.example.com “
Some hosts let you use a temporary domain while your real domain is still being connected. That can be useful, but remember to switch to the real domain before launch.
Step 3: Enter Your WordPress Admin Details
The installer will ask for your WordPress login details.
Use:
- A real admin email address you can access.
- A username that is not simply
admin. - A strong, unique password.
- A site title you recognize.
Your WordPress admin account controls the website. Treat it like the keys to the building.
Step 4: Choose Language, Version, and Update Settings
Most installers let you choose the WordPress language and version. Choose the latest stable WordPress version unless you have a specific compatibility reason not to.
If the installer includes update settings, automatic minor security updates are usually a sensible default for beginner sites. Major updates, plugin updates, and theme updates are still worth reviewing carefully, especially on business websites.
Step 5: Finish the Installation
Click the install button and wait for the host to finish. This may take a few minutes.
When the installation completes, your host should show a WordPress admin link. You can usually log in at:
“text https://yourdomain.com/wp-admin “
If your domain was just connected, it may take time for DNS changes to settle. If the site does not load immediately, wait a little and check again.
Step 6: Confirm the Site Loads Securely
Open the public website and the dashboard.
Check that:
- The site loads on the correct domain.
- The URL starts with
https://. - You can log in to the WordPress dashboard.
- The site title is correct.
- The dashboard does not show major setup warnings.
At this point, WordPress is installed. The next job is setup, not installation.
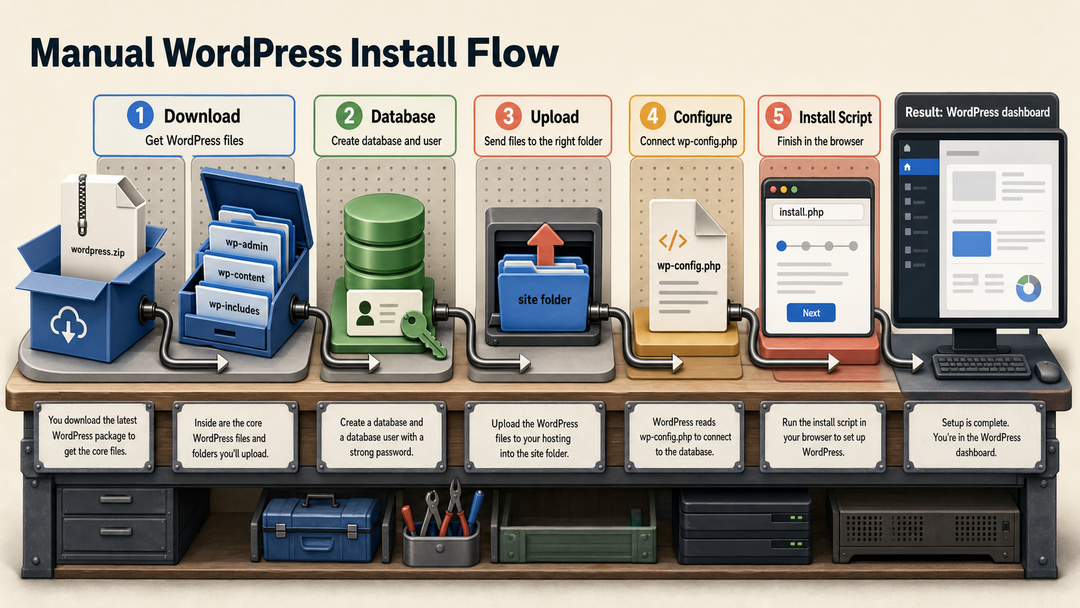
Method 2: Install WordPress Manually
Manual installation gives you more control, but it also asks more from you. You will handle the WordPress files, database, configuration, and install script yourself.
The official WordPress installation guide describes this as a simple process under most circumstances, but for beginners it is easiest when you slow down and treat it as five separate jobs.
Step 1: Download WordPress
Download the latest WordPress package from the official WordPress.org download page.
After downloading, unzip the file on your computer. You should see a folder named wordpress that contains files and folders such as:
wp-adminwp-contentwp-includeswp-config-sample.phpindex.php
These are the core files that make WordPress run.
Step 2: Create a Database and Database User
WordPress stores your posts, pages, users, settings, and many plugin settings in a database. Most hosts use MySQL or MariaDB.
In your hosting control panel, find the database section and create:
- A new database.
- A database user.
- A strong database password.
- Full privileges for that user on that database.
Save these four details:
| Detail | Example |
|---|---|
| Database name | example_wp |
| Database username | example_user |
| Database password | A strong generated password |
| Database host | Often localhost, but your host may provide something else |
Be precise here. A small typo in the database name, username, password, or host can cause the common “error establishing a database connection” message.
Step 3: Upload the WordPress Files
Use your host’s file manager or an FTP/SFTP app to upload the WordPress files to the correct folder.
For a main domain, the folder is often named something like:
“text public_html “
For a subdirectory installation, you might upload the files into:
“text public_html/blog “
Upload the contents of the wordpress folder, not the folder itself, unless you intentionally want WordPress to live at /wordpress.
That small detail matters. If you upload the entire folder to the wrong place, your site may load at:
“text example.com/wordpress “
instead of:
“text example.com “
Step 4: Create or Let WordPress Create wp-config.php
WordPress uses a file named wp-config.php to connect the website files to the database.
You have two options:
- Rename
wp-config-sample.phptowp-config.phpand add your database details manually. - Skip that step and let the browser installer create the file if the server permissions allow it.
For many beginners, option two is easier. If WordPress cannot create the file automatically, it will show instructions for creating it manually.
Step 5: Run the WordPress Install Script
Open your site in a browser.
If you installed WordPress on the root domain, visit:
“text https://example.com/wp-admin/install.php “
If you installed it in a /blog subdirectory, visit:
“text https://example.com/blog/wp-admin/install.php “
WordPress will ask for the site title, admin username, password, and email address. It may also ask whether search engines should be discouraged from indexing the site.
Leave search engines allowed if the site is ready to be public. If this is a private build or staging site, you may choose to discourage indexing temporarily, then change the setting before launch.
Click the install button. When WordPress finishes, log in to the dashboard.
Method 3: Install WordPress Locally
A local WordPress install runs on your own computer instead of public web hosting. Visitors cannot access it online unless you later move it to a live server.
Local installs are useful when you want to:
- Practice using WordPress.
- Test themes and plugins.
- Build a site before paying for hosting.
- Learn WordPress development.
- Try changes without affecting a live website.
Beginner-friendly local WordPress tools often create the server, database, and WordPress files for you. More technical tools like XAMPP or MAMP can also work, but they require more setup.
The local setup process usually looks like this:
- Install a local WordPress development tool.
- Create a new local site.
- Choose a site name and local environment settings.
- Let the tool install WordPress.
- Open the local WordPress dashboard.
A local site is great for learning, but it is not the same as launching a live website. When you are ready to publish it, you will need to migrate the site to hosting or rebuild it on the live server.
If your goal is to learn how WordPress sites are planned, customized, and maintained beyond basic setup, read our broader guide to WordPress development.
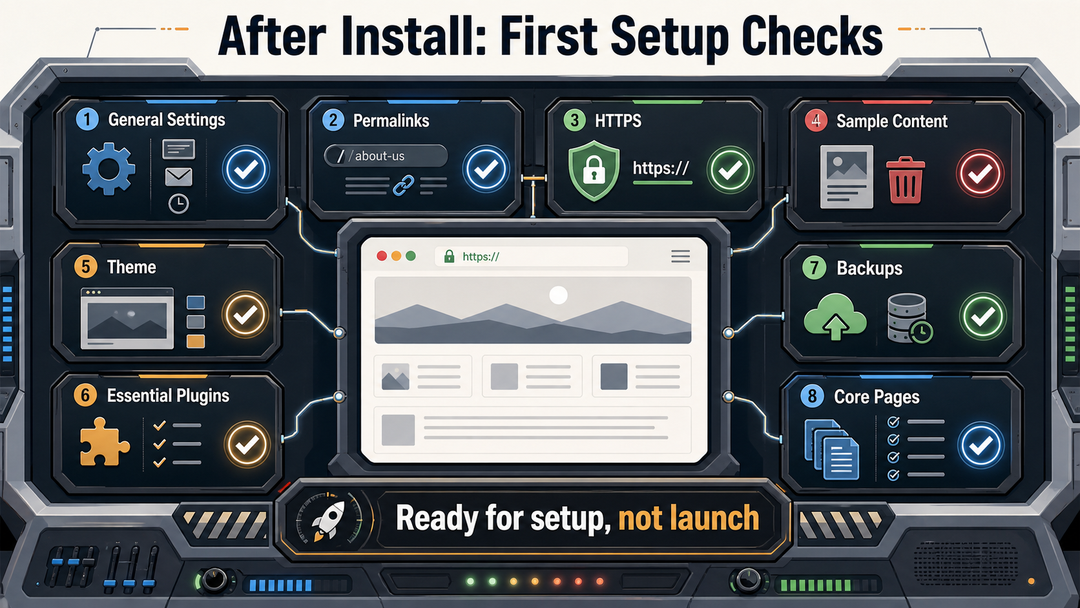
What to Do After WordPress Is Installed
Installing WordPress gives you a working website. It does not automatically give you a finished, secure, polished website.
After you log in, handle these basics before you start publishing heavily.
1. Check Your General Settings
Go to Settings > General in the WordPress dashboard.
Check:
- Site title.
- Tagline.
- WordPress Address and Site Address.
- Admin email.
- Time zone.
- Date format.
- Site language.
The time zone is easy to miss. Set it correctly now so scheduled posts, forms, orders, and logs make sense later.
2. Set Your Permalink Structure
Go to Settings > Permalinks.
For most websites, the Post name structure is clean and readable. It creates URLs like:
“text example.com/sample-post/ “
instead of URLs with numbers or query strings.
Choose your permalink structure before publishing a lot of content. Changing URL structure later can require redirects.
3. Confirm HTTPS Works
Your public website should load with https://.
If it does not, check your hosting SSL settings. Many hosts provide free SSL certificates, but you may need to activate one or force HTTPS inside the hosting dashboard.
Do this early. Secure URLs affect trust, forms, logins, browser warnings, and general site quality.
4. Remove Placeholder Content
Fresh WordPress installs often include a sample post, sample page, and sample comment.
Delete anything you do not need before launch. A live business site with “Hello world!” still sitting there looks unfinished.
5. Choose a Lightweight Theme
Your theme controls the design and layout of your site. Start with a clean, well-maintained theme rather than a heavy design packed with features you may never use.
If you are unsure how themes and plugins divide the work, our guide to how WordPress themes and plugins work explains the difference.
6. Install Only Essential Plugins
Plugins add features, but every plugin is also something you must update, maintain, and trust.
For a beginner site, think in categories:
- Backup.
- Security.
- SEO.
- Forms.
- Caching or performance.
- Analytics or measurement.
Avoid installing ten plugins because a setup wizard suggested them. Install what your site actually needs.
7. Set Up Backups
Backups are not exciting until the day you need one.
Make sure your site has a reliable backup system that includes both files and database. Hosting backups are useful, but many site owners also use a separate WordPress backup plugin or external storage.
Before making major changes, confirm you know how to restore a backup, not just create one.
8. Create Your Core Pages
Most beginner websites need a few basic pages:
- Home.
- About.
- Contact.
- Services or Products.
- Blog, if you plan to publish posts.
- Privacy Policy, where relevant.
Keep the first version simple. A clear five-page site is better than a half-built twenty-page site.
Common WordPress Installation Problems
Most installation problems come from the same few places: domain routing, wrong folder placement, database credentials, file permissions, or cached browser/DNS information.
Here is where to look first.
Error Establishing a Database Connection
This usually means WordPress cannot connect to the database.
Check:
- Database name.
- Database username.
- Database password.
- Database host.
- Whether the database user has permission to access the database.
- Whether the database server is running.
If you installed manually, compare the database details in wp-config.php with the details in your hosting control panel.
WordPress Installed in the Wrong Folder
If your site loads at example.com/wordpress when you expected example.com, the files were probably uploaded inside an extra folder.
You may need to move the WordPress files into the root folder or reinstall WordPress in the correct location.
Be careful before moving files on a site that already has content. Create a backup first.
The Site Does Not Load After Installation
If the install finished but the site does not load, check:
- DNS changes may still be updating.
- The domain may not point to the correct host.
- SSL may not be active yet.
- WordPress may be installed on a temporary URL or different folder.
- Browser cache may be showing an old version.
If the domain was connected recently, waiting is sometimes part of the process.
403 Forbidden Error
A 403 error usually means the server is blocking access. Possible causes include file permission problems, missing index files, security rules, or hosting configuration issues.
If this happens after a manual install, check that the WordPress files are in the correct folder and that your host’s file permissions are appropriate.
Cannot Log In to WordPress
Your login page is usually:
“text https://yourdomain.com/wp-admin “
If that does not work:
- Try
https://yourdomain.com/wp-login.php. - Make sure you are using the correct domain or subdirectory.
- Use the password reset link.
- Check whether a security plugin or host setting changed the login URL.
On a brand-new install, login issues often come from visiting the wrong URL.
File Upload Failed During Manual Installation
If files fail to upload through FTP/SFTP:
- Reconnect and try again.
- Upload in smaller batches.
- Check available hosting storage.
- Make sure your FTP client is not changing file names.
- Use the host’s file manager if FTP keeps failing.
The official WordPress installation docs warn that FTP clients should not convert file names to lowercase. Leave file names as they are in the WordPress package.
How Installing WordPress Fits Into Building a Website
Installing WordPress is the start of the site-building process, not the whole process.
Once WordPress is installed, you still need to shape the site around its purpose: content, design, structure, performance, security, and maintenance. That is where WordPress setup begins to overlap with WordPress development, especially if your site needs custom layouts, business features, ecommerce, or long-term technical care.
If you are comparing costs before you commit, our guide to whether WordPress is free explains the difference between free WordPress software and the real cost of domains, hosting, themes, plugins, and support.
FAQs About Installing WordPress
Is WordPress free to install?
Yes, the WordPress software from WordPress.org is free to download and install. You still usually need paid hosting and a domain name for a public website.
Do I need coding skills to install WordPress?
No, you do not need coding skills if you use a hosting provider’s WordPress installer. Manual installation requires more technical comfort, but it still does not require writing code.
How long does it take to install WordPress?
A hosting auto-installer can often finish in a few minutes. Manual installation takes longer because you need to create a database, upload files, and run the installer yourself.
Should I install WordPress manually or use my host’s installer?
Most beginners should use the host’s installer. Manual installation is better when no installer is available, when you need a custom setup, or when you want to learn the technical process.
Where do I log in after installing WordPress?
You can usually log in at https://yourdomain.com/wp-admin. If WordPress is installed in a subdirectory, include that folder in the URL, such as https://yourdomain.com/blog/wp-admin.
Can I install WordPress on my computer?
Yes, you can install WordPress locally on your computer using a local development tool. This is useful for practice, testing, and development, but the site will not be public until you move it to web hosting.
What should I install first after WordPress?
Start with the basics: set permalinks, confirm HTTPS, choose a theme, delete sample content, create core pages, set up backups, and install only the essential plugins your site actually needs.
Final Thoughts
If you are installing WordPress for a normal website, start with your host’s WordPress installer. It is the simplest and safest route for most beginners.
Manual installation is still worth understanding because it shows how WordPress actually works: files on a server, content in a database, and a configuration file connecting the two.
Once the install is done, slow down for the setup work. A clean installation, secure login, sensible theme, reliable backups, and clear first pages will give your WordPress site a much better start than rushing straight into plugins and design tweaks.