
To install WordPress on your computer, you first need a local server environment. This means setting up WordPress on your own machine instead of using public web hosting. For beginners, LocalWP is the easiest option because it sets up the server, database, WordPress files, and a local login link for you. If you prefer the classic http://localhost/site-name setup, choose XAMPP and install WordPress manually in its htdocs folder.
A WordPress site on localhost is private by default. It’s great for learning, testing themes and plugins, building a draft site, or practicing development without changing a live website.
What Localhost Means for WordPress
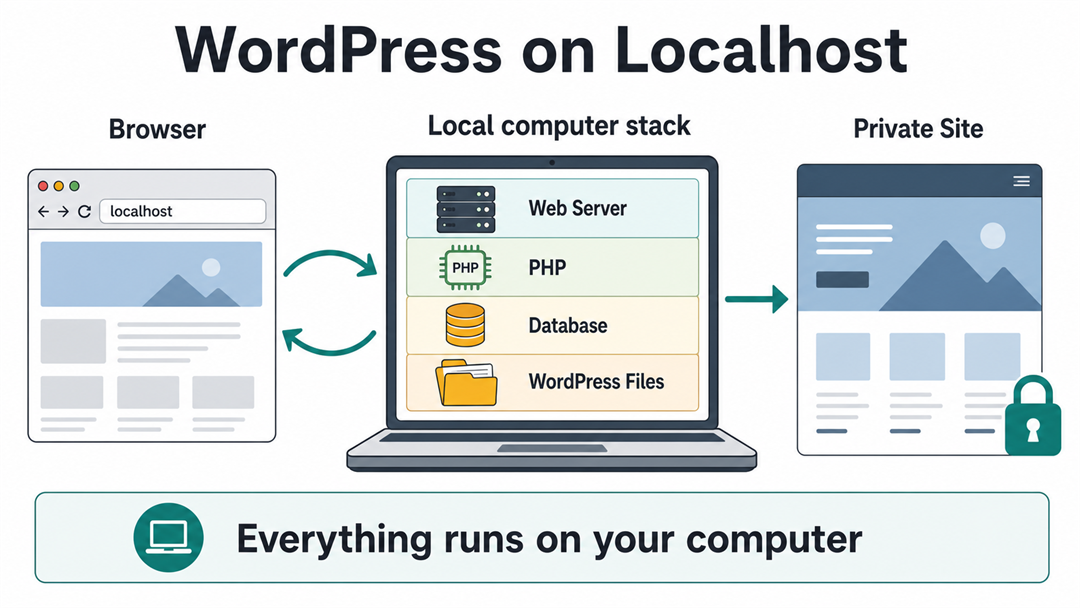
localhost means “this computer.” When you visit a normal website, your browser connects to a server somewhere on the internet. When you visit localhost, your browser connects back to your own computer instead.
This is important because WordPress isn’t a regular desktop program. It’s web software and needs:
- A web server, such as Apache or Nginx.
- PHP, the programming language WordPress runs on.
- A MySQL or MariaDB database, where WordPress stores posts, pages, users, and settings.
- The WordPress files from WordPress.org.
WordPress.org recommends using PHP 8.3 or higher, MariaDB 10.11+ or MySQL 8.0+, and HTTPS as a modern standard. Local tools handle much of the setup for you, but exact PHP and database versions vary by tool, so verify them if you plan to use the site beyond basic practice.
If you’re unsure about the difference between WordPress software and hosted WordPress accounts, check out our guide to WordPress.com vs WordPress.org. For localhost, you’ll use the self-hosted WordPress software from WordPress.org.
LocalWP vs XAMPP: Which Method Should You Use?
There are a few ways to run WordPress on your computer, but for most beginners, LocalWP or XAMPP are the best choices.
| Method | Best For | Difficulty | What You Get |
|---|---|---|---|
| LocalWP | Beginners, designers, site builders, and most learners | Easy | A guided local WordPress app that creates the site for you |
| XAMPP | Users who want a traditional localhost setup or want to learn the server pieces | Moderate | Apache, MariaDB, PHP, and phpMyAdmin so you can install WordPress manually |
| MAMP or WAMP | Users who already prefer those local server tools | Moderate | Similar local server stack with slightly different controls |
| Docker | Developers who need repeatable environments | Advanced | Container-based setup with more control |
| WordPress Playground | Quick testing in a browser without installing a local server | Easy | A temporary or configurable WordPress environment in the browser |
If you want a private WordPress site on your computer, go with LocalWP.
If you want to learn how WordPress connects to Apache, PHP, MySQL or MariaDB, and localhost, choose XAMPP.
This guide will walk you through both options.
Before You Start
Before installing anything, make sure you have:
- Admin access to your computer.
- Enough disk space for the local tool and site files.
- A modern browser.
- A stable internet connection for downloads.
- A password manager or safe place to store your local WordPress login.
You don’t need a domain name or public hosting to install WordPress on localhost. That’s the main idea: the site runs privately on your own computer.
You also don’t need to install WordPress.com. WordPress.com is a hosted service. For localhost, download or install the open-source WordPress software from WordPress.org using a local development tool.
If you want to install WordPress on a public website instead of your computer, follow our main guide on installing WordPress. The steps are different because a live site needs hosting, a domain, HTTPS, and server access.
If you’re still getting used to WordPress terms, our explanation of what WordPress is can help make the setup steps easier.
Method 1: Install WordPress Locally With LocalWP
LocalWP is the easiest choice for most people. It handles creating a database, copying WordPress files, and editing configuration details for you, all inside a desktop app.
According to the official LocalWP installation documentation, Local generally needs at least 4GB of RAM and 1.5GB of disk space, and it supports Windows 10 64-bit or Windows 11.
Step 1: Download LocalWP
Go to the official LocalWP website and download the version for your operating system. Install it like you would install any other desktop application.
If you’re on Windows, you might need to allow the app through security prompts. On macOS, you may need to approve the app in your system settings if it’s blocked the first time you open it.
Step 2: Create a New Local Site
Open LocalWP and choose the option to create a new site.
You will usually be asked for:
- Site name.
- Local domain or local URL.
- Environment type.
- WordPress username.
- WordPress password.
- WordPress admin email.
For beginners, the default environment is usually best. Custom environments are helpful if you need a specific PHP or database version, but they aren’t needed for a basic learning site.
Step 3: Let LocalWP Install WordPress
LocalWP will create the local server environment, install WordPress, create the database, and connect everything.
The main advantage of LocalWP is that you don’t have to create wp-config.php by hand, copy files into a web folder, or remember database settings.
When the setup finishes, LocalWP should show buttons to open the site and open the admin dashboard.
Step 4: Open the Site and Admin Dashboard
Click the button to open your local site. Then open the admin area and log in with the username and password you created.
You now have a working WordPress site on your computer.
The URL might not look exactly like http://localhost/site-name. LocalWP often uses its own local domain format, but that’s okay: it still runs locally on your computer.
Method 2: Install WordPress on Localhost With XAMPP
XAMPP is a classic way to install WordPress on localhost because it gives you the pieces WordPress needs: Apache, MariaDB, PHP, and phpMyAdmin. Apache Friends describes XAMPP as a free Apache distribution that includes MariaDB, PHP, and Perl.
This method is a bit more hands-on, but it helps you learn what’s happening behind the scenes.
Step 1: Download and Install XAMPP
Download XAMPP from Apache Friends and install it for your operating system.
During installation, keep the core components enabled. For WordPress, the important parts are:
- Apache.
- MySQL or MariaDB.
- PHP.
- phpMyAdmin.
After installation, open the XAMPP Control Panel.
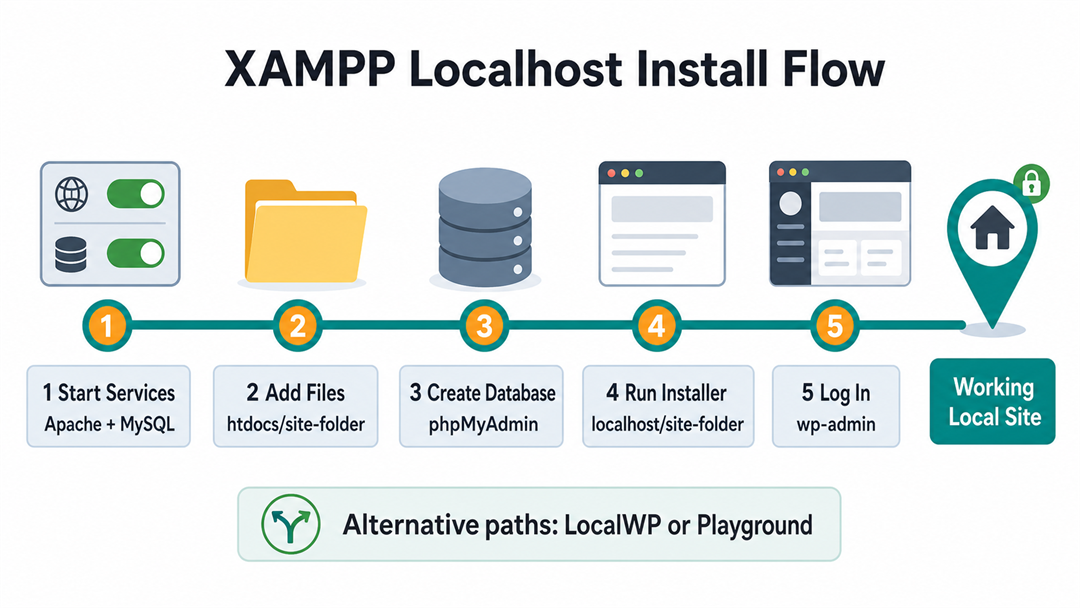
Step 2: Start Apache and MySQL
In the XAMPP Control Panel, start:
- Apache.
- MySQL.
When both are running, open your browser and visit:
http://localhost/If XAMPP is working, you should see the XAMPP dashboard or welcome page.
If Apache will not start, another app may already be using port 80 or 443. Common causes include another local server, IIS on Windows, or a communication app using the same port. You can either stop the conflicting service or change Apache’s port in XAMPP.
Step 3: Create a Site Folder in htdocs
Find the folder where XAMPP was installed. On Windows, it is often:
C:\xamppInside that folder, open:
C:\xampp\htdocsCreate a new folder for your WordPress site. Keep the name simple:
testsiteThis folder name becomes part of your local URL:
http://localhost/testsite/Don’t use spaces or special characters in the folder name. A simple, lowercase name is easier to type and troubleshoot.
Step 4: Download WordPress
Download the latest WordPress package from the official WordPress.org download page.
Unzip the file. You will see a folder named wordpress. Open that folder and look for files and folders such as:
wp-adminwp-contentwp-includesindex.phpwp-config-sample.php
Copy the contents of the WordPress folder into your new XAMPP site folder.
For example, the files should sit here:
C:\xampp\htdocs\testsite\wp-admin
C:\xampp\htdocs\testsite\wp-content
C:\xampp\htdocs\testsite\wp-includes
C:\xampp\htdocs\testsite\index.php
This detail is easy to miss. If you copy the whole WordPress folder into testsite, your site may end up at:
http://localhost/testsite/wordpress/That is not broken, but it is probably not what you intended.
Step 5: Create a Database in phpMyAdmin
WordPress needs a database before the installer can finish.
Open phpMyAdmin:
http://localhost/phpmyadmin/Choose Databases, then create a new database. For a local test site, you might name it:
testsite_wpUse lowercase letters, numbers, and underscores. Keep the name simple.
You usually do not need to create a separate database user for a basic XAMPP learning site. Many XAMPP setups use these local database details:
| Field | Typical XAMPP Local Value |
|---|---|
| Database name | The database you created, such as testsite_wp |
| Username | root |
| Password | Leave blank, unless you set a MySQL password |
| Database host | localhost |
| Table prefix | wp_ is fine for a local learning site |
If you changed the XAMPP MySQL password, use the password you created.
Step 6: Run the WordPress Installer
Open your local site URL:
http://localhost/testsite/WordPress should show the installation screen.
Choose your language, then enter the database details:
- Database name:
testsite_wp - Username:
root - Password: blank, unless you set one
- Database host:
localhost - Table prefix:
wp_
Click Submit. If WordPress can connect to the database, click Run the installation.
Next, enter your site details:
- Site title.
- Admin username.
- Strong password.
- Admin email.
For a local site, search engine visibility doesn’t matter much since the site isn’t public. Still, it’s fine to discourage search engines if you plan to move the site later and want to avoid accidental indexing.
Click Install WordPress.
You should now be able to log in to the local WordPress dashboard.
How to Log In to Your Local WordPress Site
For an XAMPP site named testsite, your local website is usually:
http://localhost/testsite/Your WordPress dashboard is:
http://localhost/testsite/wp-admin/If you used LocalWP, use the admin button inside the LocalWP app or visit the local admin URL it created.
Bookmark the login URL while you’re learning. Local sites are easy to forget since they don’t use a regular public domain name.
What to Do After the Local Install Works
Once you can open the WordPress dashboard, the installation is done. Now you can start using the site.
Good first steps:
- Go to Settings > General and check the site title, email, language, and time zone.
- Go to Settings > Permalinks and choose a clean structure, usually Post name.
- Delete the sample post, sample page, and sample comment if you do not need them.
- Install the theme you want to test.
- Install only the plugins you actually need for the experiment.
- Create a backup or export before making major changes.
- Keep notes on what you change so you can repeat it on a live site later.
Local sites are perfect for experimenting. You can break the layout, test plugins, try block patterns, change themes, and see what happens. It’s much less stressful to do this on localhost than on a live website.
If you are learning how themes, plugins, and WordPress core fit together, our guide to how WordPress themes and plugins work is a useful next read.
Common Localhost WordPress Problems
Most local WordPress problems come from one of four things: the local server isn’t running, the files are in the wrong folder, the database details are wrong, or the URL doesn’t match the folder.
| Problem | Likely Cause | What to Check |
|---|---|---|
http://localhost/ does not load | Apache is not running or the port is blocked | Start Apache in XAMPP or check for a port conflict |
| WordPress installer does not appear | WordPress files are not in the expected folder | Confirm wp-admin, wp-content, and wp-includes are inside your site folder |
| “Error establishing a database connection” | Wrong database name, username, password, or host | Recheck phpMyAdmin database name and use root, blank password, and localhost unless changed |
Site loads at /wordpress/ unexpectedly | The full wordpress folder was copied into the site folder | Move the WordPress files up one level if you want a cleaner URL |
wp-admin gives a not found error | Wrong URL or folder name | Use http://localhost/site-folder/wp-admin/ |
| MySQL will not start | Port conflict or damaged local database service | Restart XAMPP, check ports, and avoid deleting XAMPP system databases |
| Images or updates fail | File permission or local environment issue | Check that your local server can write to the WordPress folder |
The most common beginner mistake is putting files in the wrong place. WordPress files need to be inside the local server’s web folder. With XAMPP, that means inside htdocs, not in Downloads, Program Files, or a random folder on your desktop.
Localhost Is Not the Same as a Staging Site
A localhost site runs on your computer. A staging site usually runs on a web server, but is hidden from the public or separated from the live site.
| Environment | Where It Runs | Best For |
|---|---|---|
| Localhost | Your computer | Learning, testing, private development |
| Staging site | Web hosting/server | Testing changes in an environment closer to the live site |
| Live site | Public hosting/server | Real visitors |
Use localhost when you want privacy and the freedom to experiment. Use a staging site when you need to test server behavior, real hosting settings, ecommerce flows, forms, email delivery, caching, or plugin conflicts before making changes live.
Can You Move a Local WordPress Site Online?
Yes, you can move a local WordPress site online later, but it’s a migration, not just a simple upload.
A WordPress site has two main parts:
- Files, including themes, plugins, uploads, and WordPress core.
- Database content, including pages, posts, users, menus, settings, and many plugin options.
To move from localhost to hosting, you need to move both parts and usually update the URLs from the local address to the live domain.
For a small practice site, it might be easier to rebuild the site on your live host once you know what you want. For a more developed site, use a migration plugin, your host’s migration tool, or move the files and database manually.
If you want to build, customize, and maintain WordPress sites professionally, using localhost is an important part of the WordPress development workflow. It lets you test privately before making changes live.
What About WordPress Playground?
WordPress Playground is also useful to know about because it lets you run WordPress in your browser without a traditional server setup. The WordPress Playground handbook says it’s browser-based and good for quickly testing plugins, themes, and features.
Use Playground when you want to quickly try WordPress, test a plugin, explore the dashboard, or share a temporary experiment.
Use LocalWP or XAMPP if you want a more traditional local development environment on your computer, especially if you plan to keep working on the same site over time.
FAQs About Installing WordPress on Localhost
Is localhost WordPress free?
Yes, WordPress from WordPress.org is free, and tools like LocalWP and XAMPP let you develop locally without paying for software. You might pay later for a domain, hosting, premium themes, plugins, or professional help if you move the site online. Our guide on whether WordPress is free explains these costs in more detail.
Do I need hosting to install WordPress on localhost?
No, you don’t need public web hosting to install WordPress on localhost. Your computer acts as the local server. You only need hosting if you want others to visit your site online.
Do I need XAMPP to install WordPress locally?
No, XAMPP is just one option. LocalWP is usually easier for beginners, but MAMP, WAMP, Docker, and WordPress Playground can also work depending on your needs.
What is the localhost URL for WordPress?
With XAMPP, the URL depends on your folder name inside htdocs. If your folder is called testsite, the site URL is usually http://localhost/testsite/, and the dashboard is http://localhost/testsite/wp-admin/.
Why does WordPress ask for a database on localhost?
WordPress stores content and settings in a MySQL or MariaDB database. Even on localhost, WordPress needs that database to save posts, pages, users, menus, theme settings, and plugin options.
Can people see my localhost WordPress site?
No, people can’t normally see your localhost WordPress site because it runs on your own computer. To make it public, you need to move it to web hosting or use a sharing feature from a local development tool.
Is LocalWP better than XAMPP for WordPress?
LocalWP is better for most beginners because it creates WordPress sites with fewer manual steps. XAMPP is better if you want to learn about the traditional localhost stack or need a more general PHP and database setup.
Can I install plugins and themes on a local WordPress site?
Yes, you can install themes and plugins on a local WordPress site. That’s one of the best reasons to use localhost: you can test changes without risking a live website.
Final Thoughts
If you want the easiest way to install WordPress on your computer, start with LocalWP. It takes care of most database and file placement issues, which is exactly what beginners need.
If you want the classic localhost experience, use XAMPP. Start Apache and MySQL, put WordPress files in htdocs, create a database in phpMyAdmin, and run the installer from your local URL.
Either way, you’ll end up with a private WordPress site where you can learn, test, build, and make mistakes without affecting a live website.