
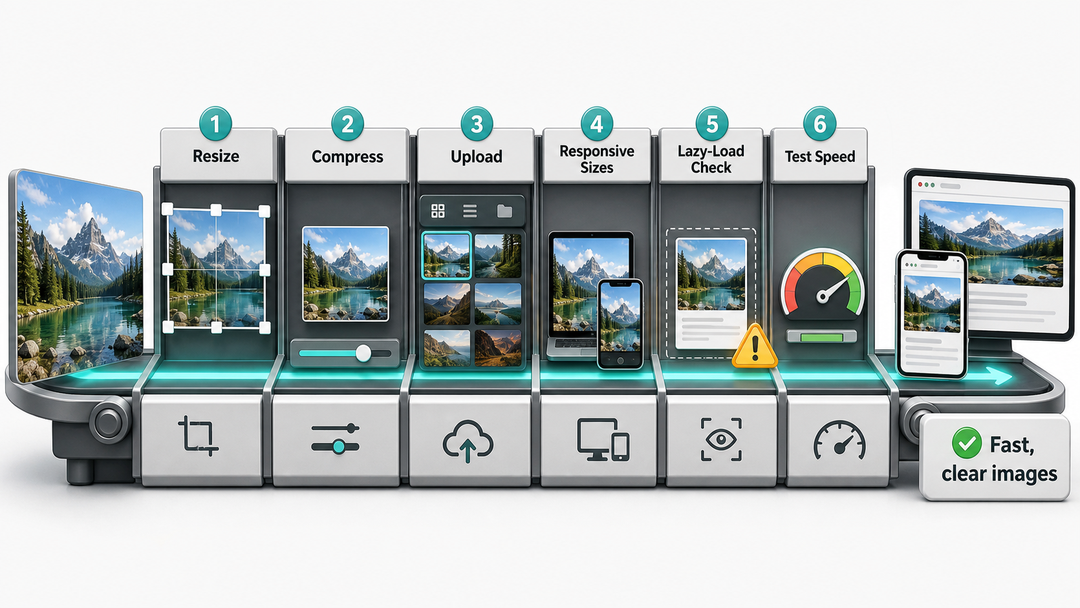
To optimize images in WordPress, resize each image to the largest size it needs, compress it before or during upload, choose the right format, let WordPress handle responsive image sizes, add helpful alt text, and avoid lazy-loading the main image at the top of the page. For most small sites, the process is simple: resize, compress, upload, check your page in PageSpeed Insights, and use a trusted plugin or image CDN to automate future uploads if your site has many images.
Image optimization is not about shrinking every image as much as possible. It’s about keeping images clear for visitors while cutting out extra pixels, extra file size, and slow loading.
If your WordPress site feels slow, images are a great place to start. They are easy to spot, common, and you can usually fix them without changing your theme. This guide will show you how to do it safely.
The important part is consistency. Once you know how to optimize images in WordPress, every future upload becomes lighter, cleaner, and easier to manage.
Why Image Optimization Matters for WordPress
Images help make a page easier to read, but large images can slow down your whole site. For example, if you use a 4000-pixel photo in an 800-pixel space, visitors still have to download all that extra data.
Good WordPress image optimization helps with four things:
- Faster loading times, especially on mobile connections.
- Better user experience, because visitors see meaningful content sooner.
- Cleaner Core Web Vitals, especially when a large hero image is slowing Largest Contentful Paint.
- Lower storage and bandwidth use, which can matter on smaller hosting plans.
Google describes Core Web Vitals as real-world user experience metrics for loading, interactivity, and visual stability. Its current guidance says a good Largest Contentful Paint, or LCP, should occur within 2.5 seconds, Interaction to Next Paint should be under 200 milliseconds, and Cumulative Layout Shift should stay below 0.1 (Google Search Central).
Images can affect these numbers directly. A large hero image can slow down LCP. If width and height are missing, the layout can shift. Lots of big photos can use up bandwidth before visitors scroll down the page.
What WordPress Already Does for Images
WordPress already has several built-in image features that help with performance.
Since WordPress 4.4, WordPress has supported responsive images by adding srcset and sizes attributes to image markup it generates. That lets the browser choose a more appropriate image file for the visitor’s screen instead of always downloading the full-size upload (WordPress Developer Resources).
WordPress also creates multiple image sizes when you upload an image. Common defaults include thumbnail, medium, large, and full size, and themes or plugins may create additional sizes. If an upload stops with WordPress’s generic “HTTP error,” follow our step-by-step media library upload troubleshooting guide.
Since WordPress 5.5, WordPress has included native lazy loading for images, meaning many images wait to load until they are close to the viewport (WordPress 5.5 documentation). Since WordPress 6.3, WordPress can also add fetchpriority="high" to the image it identifies as the likely LCP image, helping the browser prioritize the most important visual near the top of the page (Make WordPress Core).
These features help, but you still need to do your part. WordPress can make responsive versions, but it can’t fix a bad source file. If you upload a huge, poorly compressed image, your site will still be slower than it needs to be.
Step 1: Choose the Right Image Format
The image format decides how the file stores visual details. If you pick the wrong format, your image might end up much bigger than necessary.
When you optimize images in WordPress, format choice is the first fork in the road because it affects file size before compression even begins.
| Format | Best For | Avoid When |
|---|---|---|
| JPEG / JPG | Photos, realistic images, screenshots with many colors | You need transparency or very sharp flat graphics |
| PNG | Logos, icons, transparent graphics, sharp UI elements | Large photos, because PNG files can become heavy |
| WebP | General web images when your WordPress setup can serve it reliably | Your workflow cannot provide fallback or browser-aware delivery |
| AVIF | High-compression photos and graphics where supported by your plugin/CDN | You need maximum compatibility with older tools |
| SVG | Simple logos, icons, and vector illustrations | Uploading untrusted files, because SVGs can carry security risks |
| GIF | Simple animations | Photos, long animations, or performance-sensitive pages |
For most WordPress sites, the practical rule is simple:
- Use JPEG for normal photos if you are not using modern-format conversion.
- Use PNG only when transparency or crisp flat graphics matter.
- Use WebP or AVIF through a plugin, CDN, or hosting feature when your setup can generate and serve them safely.
- Use SVG carefully and only from trusted sources.
Modern formats are helpful, but don’t let them distract you. A well-sized and compressed JPEG is usually better than a huge WebP saved at the wrong size.
Step 2: Resize Images Before You Upload Them
Resizing gets rid of extra pixels you don’t need. For beginners, this is often the easiest and most effective step.
WordPress.com Support gives a useful general rule: upload images at about 1.5 to 2 times the width of your theme’s content area. If the content area is 600 pixels wide, a 1200-pixel image can still look crisp while keeping the file smaller than an oversized camera original (WordPress.com Support).
There isn’t one perfect image size for every WordPress site. The best size depends on your theme, layout, device, and what the image is for.
Use this starting point:
| Image Use | Practical Width To Try |
|---|---|
| Blog content image | 1200 px |
| Full-width hero image | 1600 to 2000 px |
| Small inline screenshot | 800 to 1200 px |
| Logo | Use the exact display size or SVG when safe |
| Product image | 1200 to 1600 px, depending on zoom needs |
These are just starting points, not strict rules. For example, if your theme shows a featured image at 900 pixels wide, uploading a 5000-pixel image is usually unnecessary. If you need product zoom in a store, you might need bigger images than a simple blog.
To check your actual display size, open the page in your browser, right-click the image, inspect it, and compare the displayed size with the natural image size. If the natural size is much larger than the displayed size, you have room to resize.
Step 3: Compress Images Without Ruining Quality
Compression makes the file smaller. The key is to use enough compression to speed up your site, but not so much that the image looks blurry or damaged.
The best way to optimize images in WordPress is to compress with a quality target, not a random file-size target.
There are two broad types:
- Lossy compression removes some image data to create a smaller file. This is often fine for photos when the quality setting is reasonable.
- Lossless compression keeps image quality intact but usually saves less space.
For blog photos, lossy compression usually works well. For logos, diagrams, and UI graphics, you might want lossless compression or a carefully saved PNG or SVG.
You can compress images before uploading by using desktop editors or online tools. You can also use a WordPress plugin that compresses new uploads automatically and can optimize existing images in bulk.
The safest beginner workflow is:
- Keep a backup copy of the original image outside WordPress.
- Resize the image to the largest size your layout needs.
- Export at a quality level that still looks clean.
- Upload it to WordPress.
- View the page on desktop and mobile.
- If the image looks good, run a speed test.
Don’t judge image quality just in the editor. Always check the published page, since the theme, CSS, cropping, and responsive sizes can change how the image looks.
Step 4: Use WebP or AVIF When Your Setup Supports It
WebP and AVIF can make images smaller than older formats, especially for photos and big visuals. The easiest way to use them in WordPress is with a plugin, CDN, or hosting feature that creates and serves the right versions to browsers.
Don’t try to manually replace every image with a modern format unless you know how fallback works. A good image optimization setup should handle delivery, caching, and browser support for you.
Good candidates for modern-format conversion include:
- Hero images.
- Featured images.
- Product photos.
- Large blog illustrations.
- Repeated visual assets across important pages.
You don’t need to worry as much about tiny icons, small thumbnails, or graphics that are already lightweight.
Step 5: Let WordPress Serve Responsive Image Sizes
WordPress responsive images work best when your theme uses the standard WordPress image functions and keeps the correct srcset and sizes attributes.
For non-developers, that means you should usually:
- Upload images through the Media Library.
- Insert images using WordPress blocks or theme-supported image fields.
- Don’t hardcode full-size image URLs in custom HTML if you can use a regular Image block instead.
- Try not to use page builder settings that make every device download the original, full-size image.
For developers or site owners working with a custom theme, the important detail is that the browser needs accurate image candidates. WordPress can generate srcset, but the sizes value should match the layout. If a theme tells the browser the image will display wider than it really does, the browser may choose a larger file than necessary.
This is a common problem for slow WordPress sites. Even if you compress the image, the page might still load a bigger version than needed if the theme or page builder doesn’t help the browser pick the right size.
Step 6: Use Lazy Loading Carefully
Lazy loading is helpful for images that appear lower on the page. It stops the browser from loading every image right away, which can make long posts and galleries load faster.
But here’s an important tip: don’t lazy-load the main image visitors see first, especially if it’s likely to be the LCP element.
The Chrome team explains that an LCP image should be discoverable in the initial HTML and prioritized when appropriate. Their guidance also says to remove loading="lazy" from the LCP image because it can delay the most important visual on the page (web.dev).
For WordPress site owners, the practical version is:
- Lazy-load images lower on the page.
- Do not lazy-load the featured hero image if it appears above the fold.
- Make sure the hero image is in regular HTML so the browser can find it quickly.
- Try not to use sliders, background-only hero images, or JavaScript-only image loading for your main visual unless you have a good reason.
If your theme uses a huge CSS background image at the top of the page, test it carefully. Background images can be harder for browsers to discover early than normal <img> elements.
Step 7: Add Width and Height to Prevent Layout Shift
Image optimization isn’t just about file size. It’s also about keeping your layout stable.
If the browser knows an image’s width and height, it can save the right space before the image loads. If not, the page might jump when the image appears, which can hurt the reading experience and affect Cumulative Layout Shift, or CLS.
WordPress usually handles image dimensions for normal Media Library images. Problems are more likely when:
- Images are pasted as custom HTML.
- A page builder strips or changes image attributes.
- Ads, embeds, or third-party widgets load above images.
- CSS forces unusual image sizing without preserving aspect ratio.
If you notice content jumping as the page loads, don’t just compress the image. Check if the image has set dimensions and if the layout reserves space for it.
Step 8: Improve Image SEO and Accessibility
Image SEO starts before you upload. Rename the file so it clearly describes what’s in the image.
Bad filename:
IMG_4821.jpg
Better filename:
wordpress-image-optimization-settings.jpg
Alt text should describe the image for people who can’t see it. It also helps search engines, but don’t use it just to add keywords.
Good alt text is:
- Specific: say what the image shows.
- Useful: explain the visual if it matters to the page.
- Concise: avoid writing a paragraph.
- Natural: include keywords only when they accurately describe the image.
Examples:
| Image | Weak Alt Text | Better Alt Text |
|---|---|---|
| Screenshot of Media Library image details | image optimization | WordPress Media Library showing image dimensions and file size |
| Hero photo of a laptop with a WordPress dashboard | WordPress SEO image speed optimize plugin | WordPress dashboard open on a laptop during image optimization |
| Diagram of resize, compress, upload, test | infographic | Workflow for resizing, compressing, uploading, and testing WordPress images |
Decorative images don’t always need detailed alt text. If an image doesn’t add important information, you can leave the alt text empty so screen readers skip it. For diagrams, screenshots, and product photos, write alt text that explains the image’s purpose.
Step 9: Bulk Optimize Existing WordPress Images
If your site has years of images, don’t try to fix every file by hand. Use a careful bulk optimization process instead.
Bulk tools can help you optimize images in WordPress faster, but they should be used carefully because they may change many media files at once.
Before bulk optimization:
- Back up your WordPress site, including files and database.
- Check whether your host already provides image optimization or CDN conversion.
- Choose a reputable plugin or host-level tool.
- Enable original-image backups if the tool offers them and storage allows it.
- Test on a small batch first.
- Review important pages after optimization.
Bulk optimization can resize, compress, and convert existing images, but it can also reveal old theme issues. For example, if a theme depends on unusual image sizes, you may need to regenerate thumbnails after changing image settings.
If the site is a business site or ecommerce store, test product pages, landing pages, homepage sections, and top blog posts before assuming everything is fine.
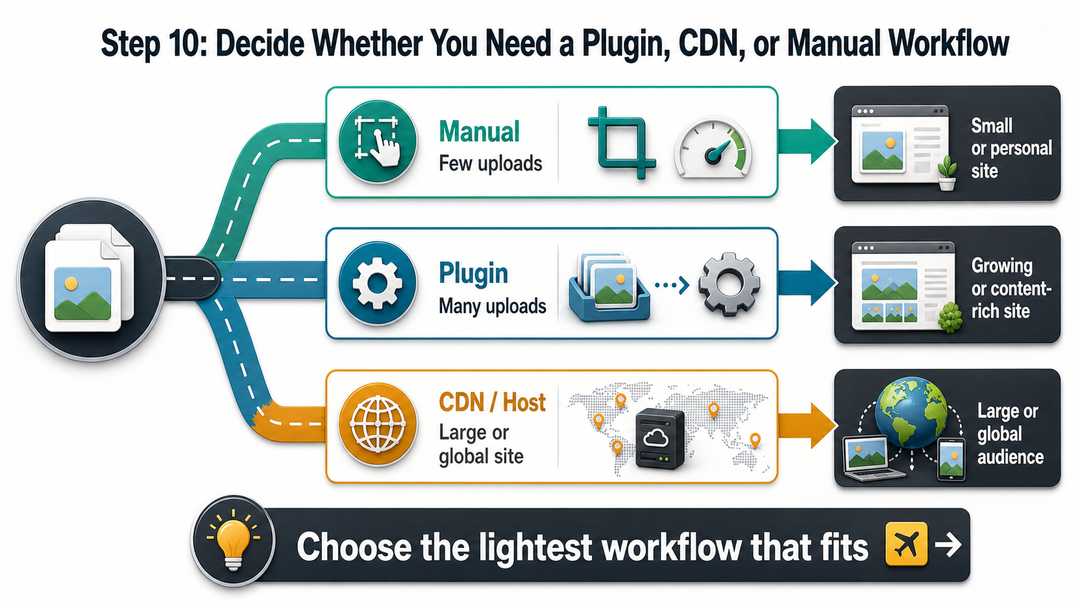
Step 10: Decide Whether You Need a Plugin, CDN, or Manual Workflow
You can optimize images in WordPress without a plugin, but as your site grows, automation becomes more helpful.
| Situation | Best Fit | Why |
|---|---|---|
| Small blog with a few images per month | Manual resize and compression | Simple, low cost, and easy to control |
| Active blog with many uploads | Image optimization plugin | Automates compression and modern-format conversion |
| Image-heavy store or portfolio | Plugin plus CDN or host image optimization | Handles scale, delivery, caching, and multiple devices |
| Developer-managed custom theme | Theme-level responsive image tuning plus automation | Prevents markup and layout issues from wasting image work |
| Site with slow global visitors | CDN | Delivers images from locations closer to visitors |
If you’re already working on overall site performance, image optimization goes well with hosting, caching, and Core Web Vitals improvements. For a bigger picture, DomFlags has a beginner-friendly guide to WordPress development that explains how themes, plugins, hosting, performance, and maintenance all fit together. If you’re still picking your setup, the guide to the best hosting for WordPress can help you see why hosting quality affects speed before you add optimization plugins.
Step 11: Test the Results
Don’t just optimize without checking. When you optimize images in WordPress, test your site before and after making changes.
Useful checks include:
- Open the page on mobile data or a throttled connection.
- Run Google PageSpeed Insights.
- Check the Core Web Vitals report in Google Search Console if the site has enough field data.
- Check the image element and make sure the displayed size isn’t much smaller than the file you’re downloading.
- Compare the image visually after compression.
Google’s Search Console Help explains that Core Web Vitals report data is based on real user visits grouped by URL status, with thresholds for LCP, INP, and CLS (Search Console Help). PageSpeed Insights can help you debug individual URLs, while Search Console is better for monitoring real-world patterns across the site.
If your site doesn’t get faster after compressing images, check for other issues:
- Render-blocking CSS or JavaScript.
- Slow hosting response time.
- Too many plugins.
- Heavy third-party scripts.
- Page builder overhead.
- Caching problems.
The WordPress Advanced Administration Handbook says many things can affect WordPress performance, like hosting, configuration, software versions, number of images, and image file sizes (WordPress Developer Resources). Images are important, but they’re just one part of the overall speed picture.
Common WordPress Image Optimization Mistakes
Uploading Camera Originals
Photos from modern phones and cameras are usually much bigger than your WordPress page needs. Resize them before uploading unless you need high-resolution downloads or zoom.
Using PNG for Large Photos
PNG works well for some graphics, but it’s usually not the best choice for large photos. Use JPEG, WebP, or AVIF instead.
Compressing Until the Image Looks Cheap
A faster page is great, but a blurry product photo or unreadable screenshot isn’t. Always check how the final page looks.
Lazy-Loading the Hero Image
Lazy loading isn’t always good for every image. If the image is above the fold and likely to be the LCP element, it should usually load early.
Forgetting Mobile Users
An image that loads quickly on a desktop might feel slow on a phone. Always check important pages on mobile devices.
Deleting Media Library Files Without a Backup
Cleaning up unused media can save space, but it might break old posts, custom fields, page builder layouts, or downloads. Always back up your site first.
Treating Alt Text as a Keyword Field
Alt text is primarily for accessibility and image meaning. Write useful descriptions, not keyword strings.
A Simple Checklist to Optimize Images in WordPress
Use this checklist for every important image:
- Choose the right format for the image type.
- Resize the image to the largest practical display size.
- Compress it while keeping visible quality acceptable.
- Rename the file with descriptive words before upload.
- Upload through the WordPress Media Library.
- Add helpful alt text when the image conveys meaning.
- Confirm the image displays correctly on mobile and desktop.
- Make sure above-the-fold images are not delayed unnecessarily.
- Use a plugin, CDN, or host feature for automation if uploads are frequent.
- Test important pages after changes.
This checklist is enough for most WordPress sites. You only need a more complex image setup if your site has a huge media library, lots of ecommerce images, high traffic, or special theme needs.
FAQ
Does WordPress optimize images automatically?
Yes, WordPress automatically creates different image sizes and supports responsive images for Media Library uploads. Modern versions also include native lazy loading. But you should still resize and compress images, since WordPress can’t fully fix an oversized original upload.
What is the best image size for WordPress?
There isn’t one best image size for every WordPress site. A good starting point is about 1200 pixels wide for blog images and 1600 to 2000 pixels wide for large hero images, but your theme’s display width should guide your final choice.
Can I optimize images in WordPress without a plugin?
Yes. You can resize images before uploading, compress them with an external tool, pick the right format, give files clear names, and write helpful alt text. A plugin is more useful if you upload images often or need to optimize many existing images at once.
Should I use WebP or AVIF in WordPress?
Use WebP or AVIF if your plugin, CDN, host, or theme can create and serve them reliably. They can make files smaller, but how you deliver them matters. A well-sized and compressed image in an older format can still be better than a poorly prepared modern-format image.
Is lazy loading good for WordPress images?
Lazy loading works well for images lower on the page, but it can slow things down if you use it on the main image at the top. The likely LCP image should be easy for the browser to find and load early.
How many image optimization plugins should I use?
Use just one main image optimization system. Running several plugins that compress, resize, convert, lazy-load, and change image URLs can cause conflicts or unpredictable results. If your host already offers image optimization, check its features before adding another plugin.
Final Takeaway
The best way to optimize images in WordPress is to cut out waste before the browser loads anything. Start with the source image: pick the right format, resize it, compress it, and give it a clear name. Then let WordPress, your theme, and your optimization tool deliver the right version to each visitor.
Keep your workflow simple and consistent. A site with well-prepared images will almost always perform better than one that depends on a plugin to fix oversized uploads later.