

Moving WordPress can be straightforward when you treat it as a controlled transfer of files, database records, and traffic. Moving a WordPress site involves copying your website files, exporting your MySQL database, importing everything to a new host, updating wp-config.php, and switching DNS. For a small site, a plugin can automate most of the work; for a large or complex site, SFTP and a database export provide more control.
Quick answer: Moving a WordPress site involves copying
wp-content, exporting your MySQL database, importing it to a new web host, updating database credentials inwp-config.php, and switching your domain DNS. For sites under 512MB, automated migration plugins can handle the transfer; larger sites often need manual SFTP and phpMyAdmin.
Whether you are moving WordPress to a new host, leaving a slow shared server, or changing your domain, this guide gives you a safe migration plan. It covers a small blog and a large WooCommerce store, including the steps that protect layouts, forms, search rankings, and uptime.
Pre-Migration Site Hygiene and Safety Audit
The biggest mistake in a WordPress site migration is transferring unnecessary problems along with the site. Old post revisions, spam comments, expired transients, abandoned plugins, and oversized backups increase transfer time and can trigger PHP timeouts. Clean the site before you create the final copy.
| Check | Action | Why it matters |
|---|---|---|
| Full backup | Create a separate files and database backup; download it off-site | Gives you a recoverable fallback |
| Updates | Update WordPress, themes, and plugins after testing compatibility | Reduces avoidable errors on the new server |
| Database cleanup | Remove revisions, spam, trash, and expired transients | Makes the SQL export smaller |
| Malware scan | Run Wordfence or Sucuri and review the result | Prevents moving an infection to the new host |
| Inventory | Remove inactive themes and plugins you no longer need | Reduces files and possible conflicts |
| Environment check | Confirm the destination supports your PHP version, database, SSL, and cron jobs | Avoids compatibility surprises |
| Traffic freeze | Plan a quiet period and pause site changes at final sync | Prevents new orders or form entries being missed |
Do not rely on a backup that exists only inside a cloud dashboard. Download a copy to your computer and, ideally, keep another copy in separate storage. If the old host fails during the move, you should still possess the complete files and database.
Purging Database Bloat, Transients, and Post Revisions
Start with a backup. Then use a maintained tool such as WP-Optimize to remove post revisions, auto-drafts, spam comments, trashed content, and expired transients. You can also perform these tasks in phpMyAdmin, but a plugin is safer for beginners because it identifies common cleanup categories without requiring you to write SQL.
Pay special attention to the wp_options table. Autoloaded options and expired transients can make every WordPress request carry unnecessary data. Review large options rather than deleting unfamiliar rows blindly; some plugins store important settings there. On a busy site, run cleanup during a low-traffic period.
A clean database can reduce the export size substantially. The exact result depends on the site, but removing years of revisions and cached records can cut the SQL file by 30% to 70%. That can mean the difference between a successful import and a timeout on shared hosting.
Running a Pre-Migration Security and Integrity Scan
Run a full Wordfence or Sucuri scan before taking the final snapshot. Review modified core files, unexpected administrator accounts, suspicious PHP files, and malware findings. Do not move an infected site and assume the new server will cure it. Migration can copy the vulnerable files, and a new IP may inherit reputation problems immediately.
Update WordPress and your extensions only after confirming that the updates work. Record your current PHP version and plugin list. If the new host uses a newer PHP version, test that combination on staging first. For more security guidance after the move, see this WordPress security checklist.
The Critical Architectural Divide: Server Transfer vs. Domain Change and the Serialized Data Trap
First decide which migration you are performing. A server migration keeps the same domain and moves the site to a different host. A domain migration changes the public URL as well as the server. These are not the same job.
The official WordPress migration documentation makes the same distinction: changing hosts, changing URLs, moving directories, and managing the old site require different precautions. Use that guide alongside this checklist when your move includes multisite, custom directory paths, or WP-CLI.
| Requirement | Server migration: same domain | Domain migration: new domain |
|---|---|---|
| Copy files and database | Yes | Yes |
Change wp-config.php credentials | Usually | Usually |
| Replace old URLs in database | Usually no | Yes, safely |
| Issue new SSL certificate | Verify and reissue if needed | Yes |
| Add redirects | No, if URLs stay identical | Yes, page-to-page 301 redirects |
| Google Search Console Change of Address | No | Yes |
| SEO risk | Low when tested properly | Higher; requires redirect and canonical checks |
If you are only changing hosts, do not run a database-wide URL replacement “just in case.” Keep the domain unchanged, update the database connection details, test the new server, and change the DNS record. Unnecessary replacements create new failure points.
The dangerous misconception is that you can open an SQL export in Notepad and replace the old domain with the new one. You should also avoid an unqualified query such as UPDATE wp_posts SET post_content = REPLACE(...). WordPress stores many settings as serialized PHP data, including widget states, menus, Customizer settings, and page-builder data.
The Anatomy of PHP Serialization in the WordPress Database
Serialized data records both a value and its length. A simplified string can look like this:
s:19:"http://oldsite.com";| Serialized part | Meaning | Why it matters during a domain change |
|---|---|---|
s | String type | Tells PHP the stored value is text |
19 | Character count | Must match the exact length of the URL that follows |
"http://oldsite.com" | Stored value | Replacing it with a different-length URL requires recalculation |
Annotated takeaway: s:19 is not a record ID; it is a length declaration. A serialized-data-aware tool must update that number whenever the replacement URL has a different length. This is why raw SQL replacement can break widgets, menus, Customizer settings, or page-builder layouts.
The 19 is the character length PHP expects. If you change the value without recalculating that number, PHP may reject the structure during unserialize(). WordPress can then lose an entire option, widget, menu, or page layout even though the SQL import itself reports success.
The same problem can occur inside nested arrays and page-builder structures. That is why a search-and-replace tool must understand serialized data rather than treating the database as ordinary text. Read the PHP documentation for serialize and unserialize behavior before modifying a production database.
Safe Database String Replacement Protocols
For a domain change, use a tool that unpacks and repacks serialized values. Better Search Replace can perform a dry run so you can review the number of replacements before writing changes. Keep a database backup and select the correct tables, including custom tables used by important plugins.
If you have SSH access, WP-CLI is an excellent option:
wp search-replace 'https://oldsite.com' 'https://newsite.com' --all-tables --precise --dry-run
wp search-replace 'https://oldsite.com' 'https://newsite.com' --all-tables --precise
Review the dry-run result first. Replace both HTTPS and HTTP variants only when they exist, and check for trailing-slash differences. The official WP-CLI search-replace command is designed to handle serialized data. Never run a destructive replacement without a tested rollback backup.
Choosing Your Migration Path: Plugin Automation vs. Manual Transfer
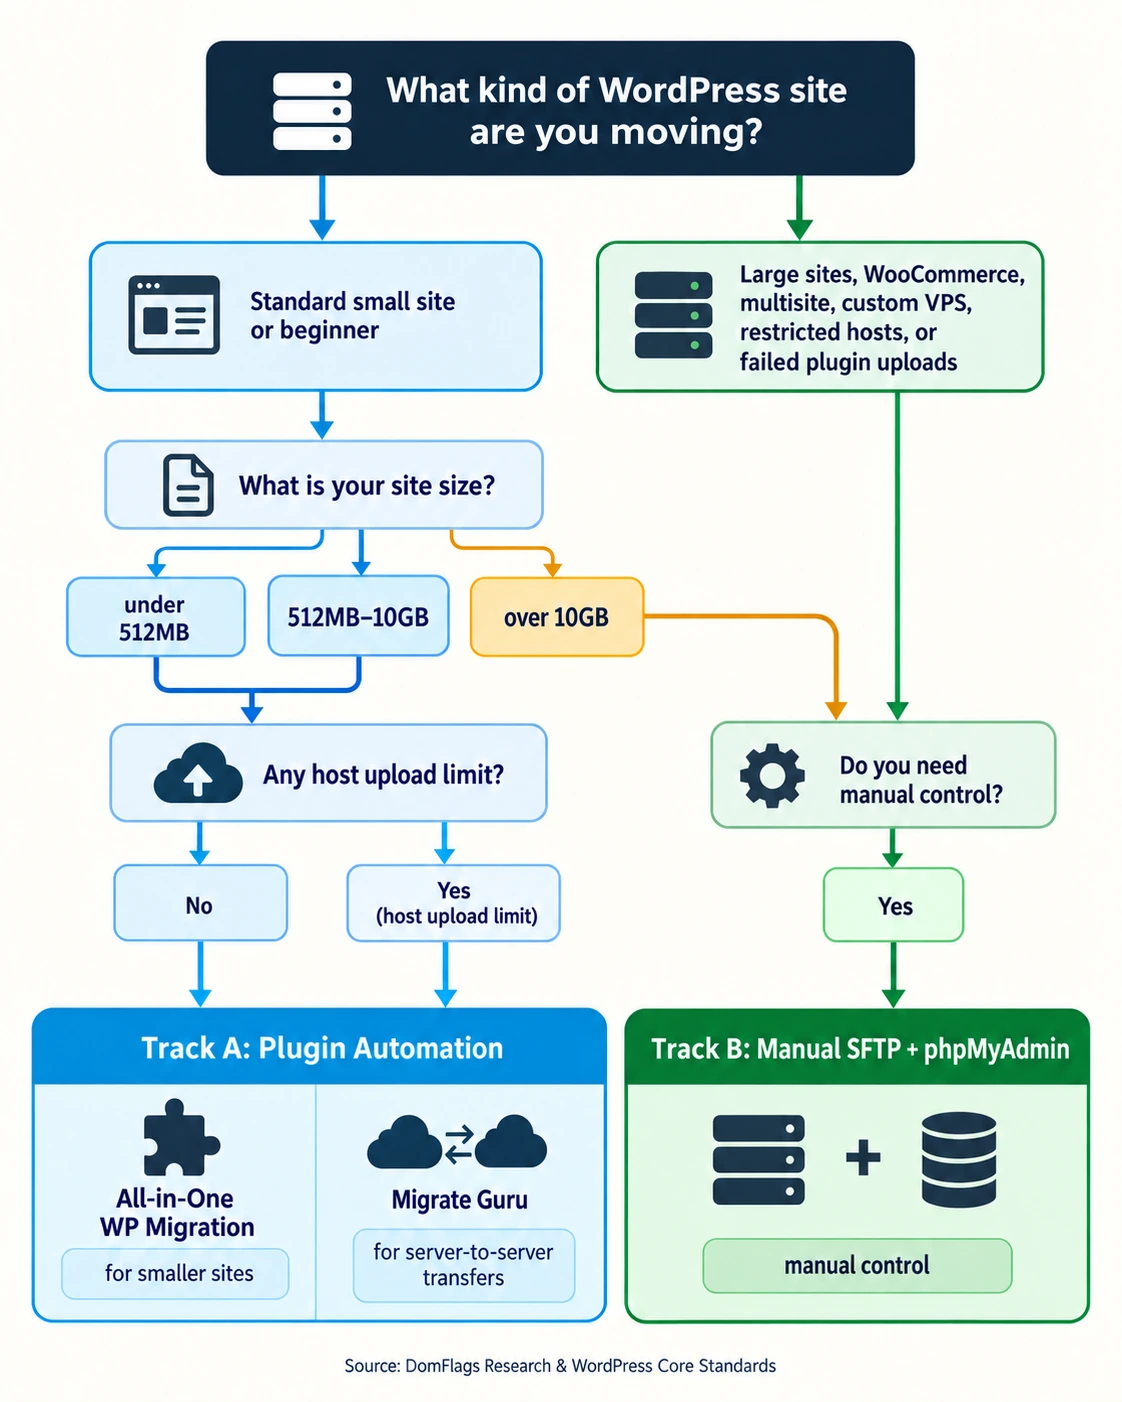
Your best method depends on site size, server limits, access, and tolerance for technical work. Plugin automation is convenient, but it still runs within hosting limits unless the service transfers data server-to-server. Manual migration takes longer but avoids browser upload caps and gives you a clear recovery path.
| Method | Best for | Size and limit considerations | Cost | Complexity |
|---|---|---|---|---|
| All-in-One WP Migration | Small standard sites | Free import ceiling is 512MB, plus host upload limits | Free within limits; $69 Unlimited Extension listed by ServMask | Low |
| Migrate Guru | Larger sites and beginners | Server-to-server transfer; listed capacity up to 200GB | Free | Low to medium |
| Duplicator | Users who want a packaged installer workflow | Depends on host upload, PHP, and package settings | Free and paid tiers | Medium |
| Manual SFTP + phpMyAdmin | Large, custom, multisite, or WooCommerce sites | Avoids web upload caps; still depends on disk and database limits | Usually free | Medium to high |
Track A: When to Use Automated Migration Plugins
Choose a plugin when you have a standard single site, reliable administrator access, and a manageable backup. All-in-One WP Migration is convenient for smaller sites; its official WordPress.org listing documents the plugin’s current workflow and limits. Migrate Guru is useful when the archive is too large for a browser upload because it uses a server-to-server workflow through BlogVault infrastructure.
Plugins are a good fit if you do not have SSH or cPanel experience. They are less attractive when the site has tens of thousands of files, a large database, a multisite network, or active transactions that must be synchronized carefully.
Track B: When Manual SFTP and Database Migration is Mandatory
Use manual SFTP and database migration when a plugin hits a 504 Gateway Timeout, the backup exceeds an upload limit, or the host does not allow the required PHP settings. Manual work is also the better choice for an enterprise site, a complex WooCommerce store, a multisite network, or a custom VPS where you control the server.
Before you begin, obtain SFTP credentials, port 22 access, database credentials, and a destination IP. Avoid ordinary FTP on port 21 for administrative transfers because it does not provide the same protection for credentials and data in transit.
If you have not selected the destination yet, use this WordPress hosting selection guide to compare the infrastructure, support, backups, and performance features that matter during a migration.
Accessible text alternative: Choose plugin automation for a standard single site with administrator access and manageable size. Choose manual SFTP plus phpMyAdmin for large or complex sites, multisite, WooCommerce stores with active transactions, custom servers, or hosts with restrictive upload and execution limits.
Track A: Automated Step-by-Step Migration via Plugins
The destination must have a fresh WordPress installation before you import a packaged site. Create the installation on the new host, but do not begin changing public DNS until you have tested it. Keep the old site available as your fallback.
Exporting and Importing via All-in-One WP Migration
- On the old site, install and activate All-in-One WP Migration.
- Open
All-in-One WP Migration > Export, chooseExport To > File, and wait for the.wpressarchive to finish. - Download the archive to your computer. Check its size and keep a second copy.
- Install WordPress and the same plugin on the new host.
- Open
Import > Import From > Fileand upload the archive. Confirm the overwrite warning only after checking that the destination is the disposable fresh install. - Sign in with the credentials from the old site, then open
Settings > Permalinksand click Save Changes twice.
The free plugin is convenient, but its free import ceiling is 512MB and your host may impose a lower upload_max_filesize or post_max_size. The official plugin listing documents the current plugin details. If the archive exceeds the limit, use Migrate Guru, manual transfer, or the appropriately licensed extension rather than trying to split files randomly.
Bypassing Server Limits with Migrate Guru (Server-to-Server)
Install Migrate Guru on the old WordPress site and enter the destination host details it requests, such as SFTP or cPanel credentials and the destination URL. Start the migration and monitor the status email or dashboard. The service transfers data between servers and handles the large-file workflow outside the browser upload process.
Confirm the destination credentials carefully. Use a temporary or restricted account when the host supports one, and remove it after the migration. When the transfer reports completion, test the destination through its temporary URL or a local hosts-file override. Check that media, forms, scheduled tasks, and logged-in sessions behave correctly before changing DNS.
Track B: Manual Step-by-Step Migration via SFTP and phpMyAdmin
Manual migration has five moving parts: the SQL database, WordPress files, a new database and user, the wp-config.php connection, and DNS. Complete the work in that order, then test before launch. For a high-traffic store, schedule a final database sync or maintenance window so new orders do not land on only one server.
Exporting the MySQL Database via phpMyAdmin
- Log in to cPanel or Plesk and open phpMyAdmin.
- Select the database used by the old WordPress installation.
- Open Export, choose Quick, and select SQL as the format.
- Start the export and save the
.sqlfile locally.
Check the table prefix before you leave. It is often wp_, but a security-conscious installation may use another prefix. Export the complete database, not only the posts table, because users, options, metadata, menus, plugin settings, and WooCommerce records may be stored elsewhere.
Archiving and Transferring WordPress Files via SFTP
Do not download 40,000 loose files one by one if the host gives you a better option. Use cPanel File Manager or SSH to compress public_html, or at least wp-content, into a .zip or .tar.gz archive. The wp-content/uploads directory contains your media library, while themes and plugins live alongside it.
Connect with FileZilla or another SFTP client using the host, username, private key or password, and port 22. Download the archive and upload it to the new web root. Extract it there, then confirm that index.php, wp-admin, wp-includes, and wp-content sit in the correct document root rather than in an extra nested folder.
Creating the New MySQL Database and User
On the new host, open the MySQL Database Wizard. Create a database, create a user with a strong generated password, and assign that user to the database with ALL PRIVILEGES. Record the exact database name, username, password, and host value. cPanel may add an account prefix to the first two values.
If you are using a managed service, the host may provide a remote database hostname rather than localhost. Do not guess. Copy the value from the host’s connection instructions.
Reconfiguring wp-config.php on the Destination Server
Edit wp-config.php in the destination web root and replace only the connection values that changed:
define( 'DB_NAME', 'account_newdatabase' );
define( 'DB_USER', 'account_newuser' );
define( 'DB_PASSWORD', 'use-a-strong-password-here' );
define( 'DB_HOST', 'localhost' );
DB_HOST is often localhost, but not always. SiteGround, cloud databases, and some managed hosts provide a unique hostname and port. Preserve the table-prefix line, salts, and other constants unless you have a specific reason to change them. Set restrictive file permissions and never publish the file contents.
Importing the Database and Restoring Tables
Open phpMyAdmin on the new host, select the empty database, choose Import, select the SQL file, and keep the character set compatible with the export, commonly utf-8. Click Go and wait for the success message. Large imports may exceed phpMyAdmin’s upload or execution limits; in that case, ask the host for a command-line import or use a supported database tool.
Confirm that all expected tables exist and use the correct prefix. Then open the site locally. If WordPress shows “Error Establishing a Database Connection,” recheck every DB_* value, the database user privileges, and the database host. This database connection error guide covers the same checks in more detail.
Pre-Launch Testing via Local Hosts File Before Changing DNS
The safest way to test a migrated site is to load the real domain from the new server on your computer while public visitors still reach the old server. A local hosts-file override does this without waiting for DNS propagation.
Modifying the Hosts File on Windows and macOS
On Windows, open Notepad as administrator. Choose File > Open, browse to:
C:\Windows\System32\drivers\etc\hostsAdd a line at the bottom, replacing the IP and domain:
123.45.67.89 yourdomain.com www.yourdomain.comOn macOS, open Terminal and run sudo nano /etc/hosts. Enter your password, append the same IP-and-domain line, press Control+O to save, and Control+X to exit. Use the new server’s real IP, not a shared hosting account label.
After testing, remove the line. Otherwise your computer may continue visiting the new server while everyone else sees the public DNS result. Flush the local DNS cache if the change does not appear immediately:
Windows: ipconfig /flushdns
macOS:   sudo dscacheutil -flushcache; sudo killall -HUP mDNSResponder
The DNS caching model is defined by the IETF DNS specification, RFC 1035, which documents TTL as the period that a resource record may be cached. A lower TTL improves the planned cutover window, but it cannot override a resolver that has already cached the previous answer.
Executing the Pre-Launch Smoke Test
Open a private browser window and test the homepage, representative posts, category pages, search, contact forms, and checkout if applicable. Log in to /wp-admin/, edit a test draft, upload a test image, and check that media URLs resolve. Look for PHP fatal errors, missing styles, broken JavaScript, redirect loops, and database connection drops.
Also verify email delivery, cron jobs, analytics, caching, robots directives, canonical URLs, and XML sitemaps. Check the site on a phone and desktop. Do not change DNS until the new server passes this checklist.
The Zero-Downtime DNS Cutover Protocol
DNS cutover determines where visitors go after the files are ready. The cleanest approach is to change the existing A record to the new server IP. Changing nameservers delegates the entire DNS zone to another provider and can take longer because every DNS record must be recreated correctly.
Phase 1: Lowering TTL 48 Hours Before Migration
Twenty-four to 48 hours before the move, open your DNS console at Cloudflare, your registrar, or your host. Find the domain’s A record and reduce its TTL to 300 seconds, or five minutes. It may currently show Automatic, 14400, or 86400 seconds.
TTL tells recursive resolvers how long they may cache an answer. Lowering it ahead of time gives old cached answers a chance to expire before the switch. It does not force every resolver to refresh at exactly five minutes, so keep the old host running during the transition.
Phase 2: Updating the A Record and Post-Launch TTL Restoration
After the smoke test and final database sync, update the A record to the new server IP. Keep the hostname, proxy settings, and other DNS records unchanged unless your host specifically requires a change. Check the result from more than one network and use a DNS checker if needed.
Accessible text alternative: At T-48 hours, lower the A-record TTL to 300 seconds. At T-2 hours, complete the final files and database sync. At T-0, update the A record to the new server IP and monitor both hosts. At T+48 hours, confirm stability and restore the normal TTL.
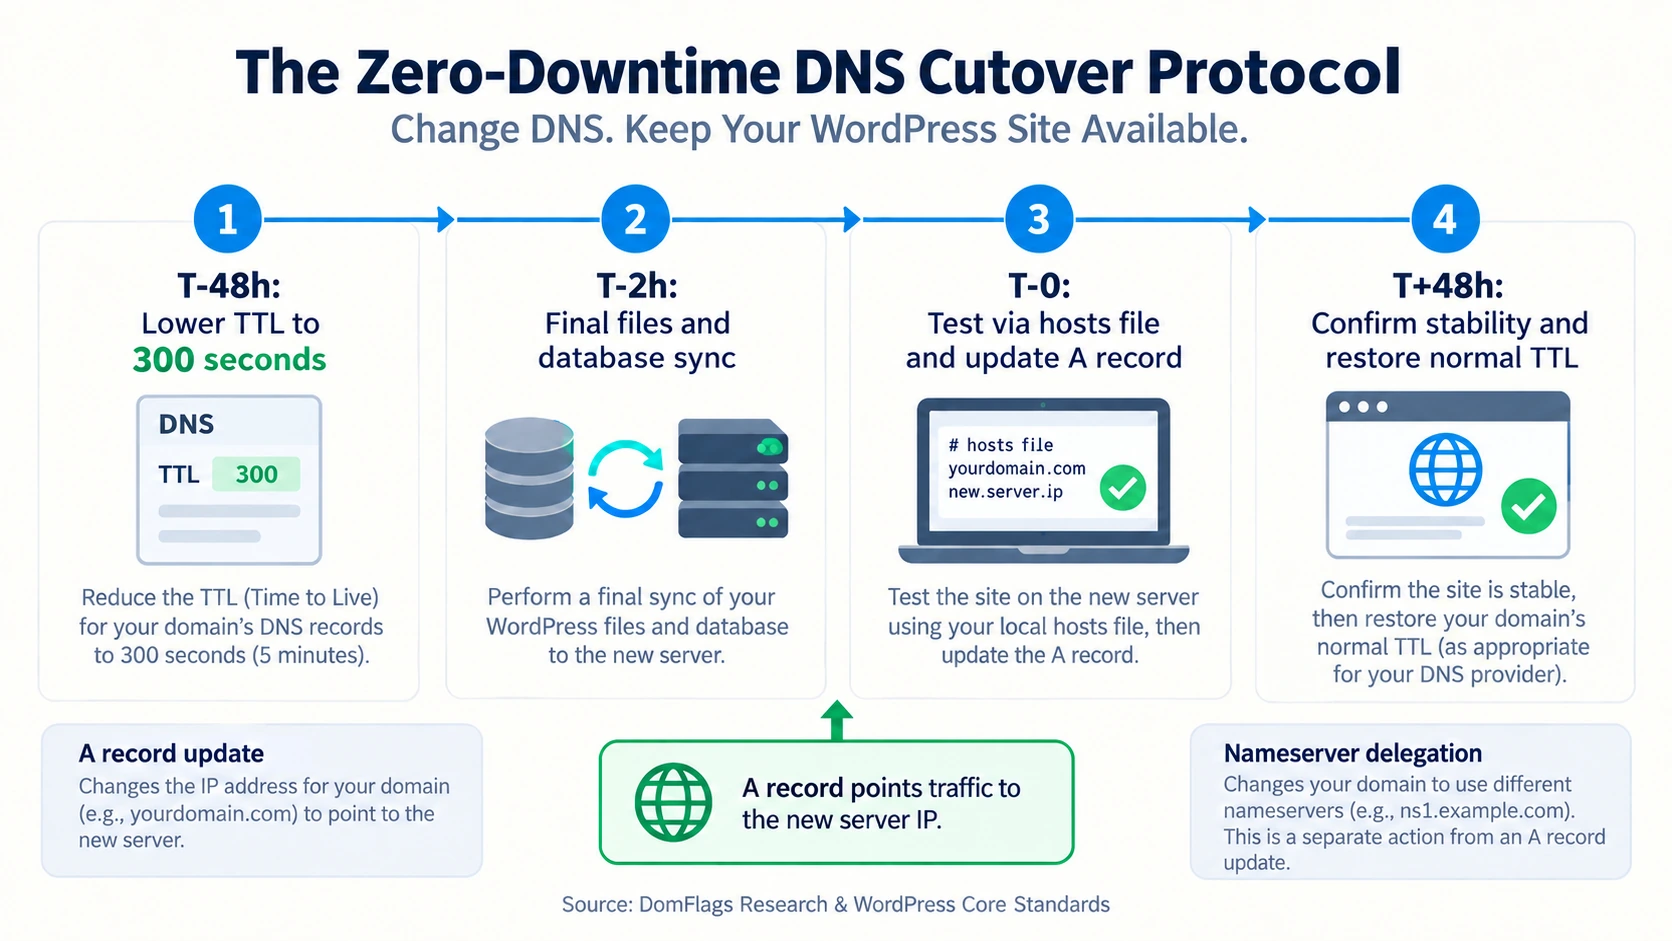
Once the site remains stable for about 48 hours, restore the normal TTL or 86400 seconds. Leave the old hosting account active for at least seven days, and longer if DNS, email, or business traffic is critical. Do not cancel it until logs show that visitors and background services have moved successfully.
Post-Migration Polish, SEO Preservation, and Troubleshooting
DNS is not the final step. Complete the following checks immediately after launch:
- Open
Settings > Permalinksand save twice. - Issue or reissue the SSL certificate on the new host.
- Confirm HTTPS, redirects, canonical URLs, robots.txt, and XML sitemaps.
- Purge old page caches and rebuild any server or CDN cache.
- Test forms, email, checkout, scheduled tasks, and webhooks.
- Compare analytics and error logs with the old server.
Flushing Permalinks to Eliminate 404 Errors
If the homepage works but internal pages return 404, WordPress may need to regenerate its rewrite rules. Sign in to the new site, open Settings > Permalinks, make no changes, and click Save Changes. Click it again, then retest several internal URLs. This rewrites .htaccess on Apache-based hosting.
Reissuing SSL Certificates and Resolving Mixed Content
After the A record points to the new server, generate a Let’s Encrypt certificate or enable the host’s AutoSSL. Test both the root domain and www variant if both are configured. A certificate issued for the old server does not automatically exist on the new one.
Mixed-content warnings usually mean the database or theme still references http:// assets. Use a serialized-data-aware replacement tool to update those URLs, then purge caches. Confirm that images, scripts, fonts, and forms all load over HTTPS.
SEO Preservation: 301 Wildcard Redirects and Google Search Console (If Changing Domains)
If you changed domains, map every important old URL to its closest new equivalent. Avoid sending every page to the new homepage. On Apache, a basic host-level redirect can look like this:
RewriteEngine On
RewriteCond %{HTTP_HOST} ^oldsite\.com$ [OR]
RewriteCond %{HTTP_HOST} ^www\\.oldsite\.com$
RewriteRule ^(.*)$ https://newsite.com/$1 [R=301,L]
Test the redirects in a private window and with a header checker. Update internal links, canonical tags, XML sitemaps, structured data, email templates, and social profile links. Add both domain properties to Google Search Console and submit the Change of Address request where eligible. Google recommends maintaining redirects for at least one year while the new URLs are discovered and signals transfer. Read the Google site-move documentation for current requirements.
Rapid Recovery Guide for Common Post-Migration Errors
| Symptom | Likely cause | First fix |
|---|---|---|
| Error Establishing a Database Connection | Wrong DB_NAME, user, password, host, or missing privileges | Recheck wp-config.php and test the database user |
| White Screen of Death | PHP incompatibility or a plugin/theme crash | Review PHP logs; rename wp-content/plugins over SFTP to disable plugins |
| 500 Internal Server Error | Invalid .htaccess, permissions, or PHP error | Rename .htaccess, save permalinks, and inspect the error log |
| Internal pages return 404 | Rewrite rules were not regenerated | Save permalinks twice and verify the document root |
| Images are missing | Wrong uploads path, permissions, or URL replacement | Check wp-content/uploads, permissions, and media URLs |
| HTTPS warning or redirect loop | Certificate, proxy, or forced-HTTPS mismatch | Verify SSL, site URLs, and CDN proxy settings |
Change one thing at a time and preserve the old host as a rollback. If the old site is still healthy, point DNS back to it while you investigate rather than making several untracked changes on the new server.
Frequently Asked Questions About Moving WordPress
Can I transfer my WordPress website to another host for free?
Yes. You can transfer a WordPress website to another host for free with open-source tools. Migrate Guru lists support for sites up to 200GB, while manual SFTP file transfers and phpMyAdmin database exports cost nothing. Some hosts also include a migration plugin or a concierge transfer with a hosting plan.
The real cost is time and risk. Create an off-site backup, check the destination’s PHP and database support, and keep the old account active until you have verified the new site.
Why are some website owners moving away from WordPress?
People moving away from WordPress often want to reduce maintenance, plugin updates, security work, and hosting decisions. They may choose a hosted builder such as Squarespace or an ecommerce platform such as Shopify for a more managed experience.
That trade-off is not universal. WordPress offers extensive customization, data portability, and control over hosting. This Squarespace vs. WordPress comparison explains the wider platform decision, while self-hosted WordPress architecture covers the ownership model.
Is All-in-One WP Migration truly free for full site transfers?
The core All-in-One WP Migration plugin is free to install, but its free import workflow has a 512MB ceiling, and your host may impose a lower PHP upload limit. ServMask currently lists the Unlimited Extension at $69/year for its standard license; confirm the live price before purchase because commercial pricing can change. Migrate Guru or manual SFTP is a better fit if you want to avoid that purchase.
Check the archive size before you begin. A site can be below the plugin’s limit and still fail because upload_max_filesize, post_max_size, memory, or execution time is too low.
How long does a WordPress website migration take?
A small automated migration often takes 15 to 30 minutes once the destination is ready. A manual SFTP migration commonly takes one to two hours, depending on the file size, database, and connection speed. DNS can take from a few minutes to much longer when TTL was not lowered in advance.
Add time for testing. A careful migration includes backup verification, local preview, SSL setup, forms and checkout checks, and post-launch monitoring. The transfer itself is only one part of the job.
The broader WordPress development guide can help you plan the destination architecture, and this WordPress backup guide is useful before you take the final snapshot.
After launch, review your WordPress caching plugin options and, if you are also evaluating a hosted platform, compare WordPress.com and WordPress.org before making another structural change.
Moving WordPress safely is less about finding one magic button and more about controlling the sequence: clean the site, preserve a rollback, choose the right transfer path, test privately, cut over DNS, and monitor the result. For most small sites, a plugin is enough. For large, complex, or business-critical sites, manual SFTP and database control give you the reliability and visibility you need.