
When a WordPress site suddenly shows a white screen, a fatal error, or a broken WooCommerce checkout, a wordpress bug fix usually starts with evidence, not panic. In most cases, the database, uploads, and media remain intact even when the page is unavailable. Stop editing, preserve a backup, and isolate the failing layer before changing code.
This guide covers emergency triage, the blind-update mistake, a safe diagnostic workflow, fixes for seven destructive errors, and the economics of DIY troubleshooting versus professional help.
To fix a broken WordPress website fast: First, check your admin email for an automated WordPress Recovery Mode link. Next, access your hosting file manager, open
wp-config.php, and setWPDEBUGtotrue. Temporarily rename/wp-content/plugins/to isolate conflicting code, increaseWPMEMORY_LIMITto256M, and restore a clean pre-crash backup if database errors persist.
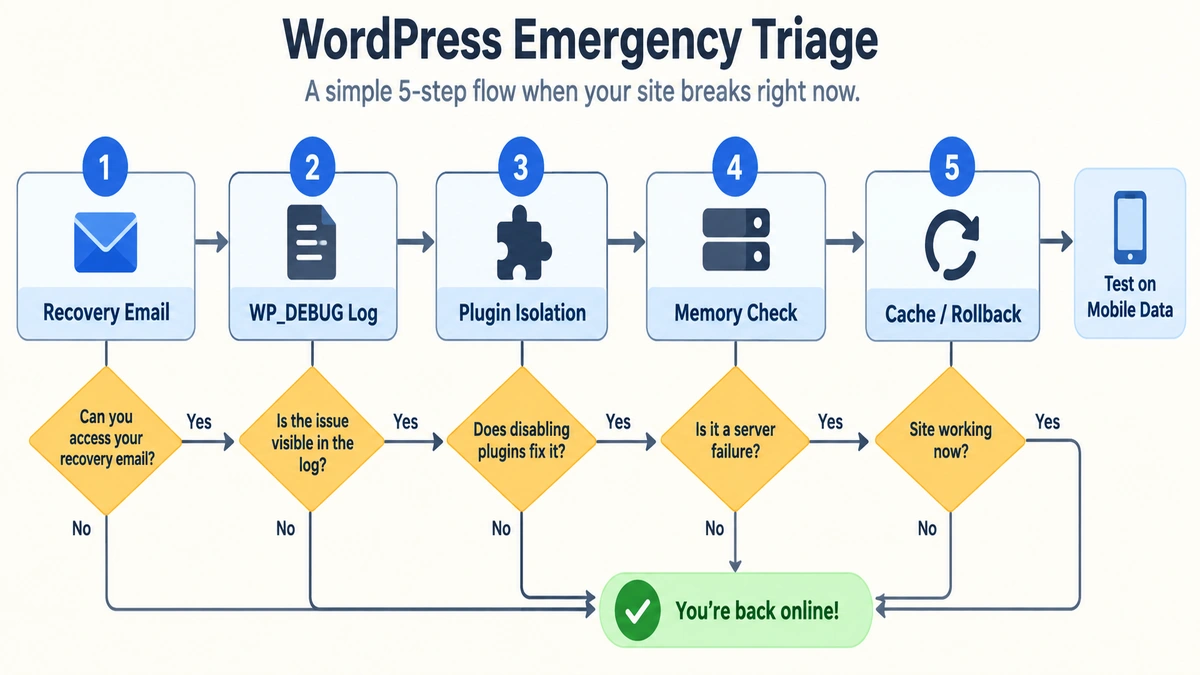
Rapid Emergency Triage: What to Do in the First 5 Minutes for a WordPress Bug Fix
Do not click Update All, delete plugins, or run database repair yet. The first five minutes should tell you whether the failure is local, temporary, or server-side. Observation preserves clues and often turns a frightening outage into a short wordpress error fix.
- Verify the symptom. Hard-refresh with
Ctrl+F5on Windows orCmd+Shift+Ron macOS. Test the homepage, a known post, and/wp-admin/. A single stale page can be a browser HTTP cache problem rather than a crashed server. - Test outside your network. Disconnect your phone from Wi-Fi and open the site over cellular data. If it works there, a local IP firewall block, DNS cache, or security-plugin lockout may be affecting your normal connection.
- Check the administrator inbox. Search the inbox and spam folder for the WordPress 5.2+ Recovery Mode email. Do not delete it; the link contains a temporary secret login token.
- Record the exact message and time. Save screenshots, the URL, the last action taken, and whether visitors or only administrators are affected. Note any DNS change or plugin/theme update.
- Preserve the state. Pause edits and create a hosting snapshot or downloadable backup before touching files, configuration, or the database.
Warning: Never delete a plugin, edit database tables, or run a repair command during this observation stage. A clean symptom record and a recoverable snapshot are more valuable than a blind change.
Checking for the Automated WordPress Recovery Mode Email
WordPress Core 5.2 and later can detect a fatal PHP error and send the site administrator an email with a subject similar to “Your Site is Experiencing a Technical Issue.” Check every administrative address, spam folders, and mail quarantine. The message identifies the affected component and includes a unique recovery link.
Open the link in the same browser, sign in to /wp-admin/, and inspect the paused plugin or theme. Recovery Mode isolates the failing extension for that administrator session, so you can deactivate or update the specific component without guessing. Treat the email as a diagnostic lead, not proof that the entire site is damaged.
Ruling Out Local Browser, DNS, and Firewall Blocks
Run three quick checks: test on mobile data, use an external “is it down for everyone” checker, and clear browser cookies for the domain. A DNS propagation delay can make different networks reach different servers after a DNS change. A security tool such as Wordfence or Sucuri can also lock out an administrator after repeated failed logins while public pages continue to work.
If the site fails on every network and the timestamp matches a change, continue with the diagnostic framework below. If only one network fails, contact the host about an IP block before modifying WordPress files.
The Blind Update Fallback: Why Panicked Fixes Make a WordPress Bug Fix Worse
Updating is healthy during planned maintenance, but “Update All” is a poor emergency response while PHP is crashing or memory is exhausted. A batch update can time out halfway through, leaving a component partially replaced, an aborted SQL query, a locked database option, or a lingering .maintenance flag file. The visible symptom may then change, making the original cause harder to identify.
The safe rule is simple: isolate first, update second. Capture the current state, identify the failing plugin, theme, PHP version, or server limit, and then test one controlled change at a time. If a routine update is necessary after recovery, use staging or a recent snapshot and watch the process to completion.
Myth: “Installing a fixer plugin and updating everything will repair a broken site.” Reality: An active crash needs fewer variables, not more. Configuration-level logging, file isolation, and a known-good backup preserve the evidence needed for a root-cause fix.
The Dangers of Installing “Fixer” Plugins on an Unstable Site
A plugin is PHP code executed inside the same environment that may already be failing. Adding a “fixer” plugin increases memory use and introduces another compatibility surface. It cannot reliably repair a syntax collision, a corrupt .htaccess, invalid database credentials, or a host-level timeout from inside the broken request.
Use the hosting file manager, SFTP, server logs, and WordPress configuration instead. Once the site is stable, remove tools you do not need and update from a tested baseline. This is plugin conflict troubleshooting, not plugin accumulation.
The Golden Rule: Taking a Pre-Fix Snapshot Before Modifying Code
Take a one-click hosting backup or snapshot before changing a single line. If that is unavailable, download wp-config.php, the complete wp-content directory, and a MySQL export through phpMyAdmin. Keep the files outside the server. Our guide on how to back up a WordPress website explains the minimum recoverable set.
Name the snapshot with the date, time, and reason. A backup is useful only if you know where it is, can access it, and have confirmed that it contains both files and database data.
Step-by-Step Diagnostic Framework: How to Safely Isolate Any WordPress Bug
Senior engineers reduce the search space in layers: logging, component isolation, theme isolation, resource checks, and controlled restoration. Work on staging when possible. On a live site, avoid displaying technical errors to visitors.
Activating WP_DEBUG and Logging Errors Invisibly
Open wp-config.php through SFTP or the hosting File Manager and place this block directly above / That's all, stop editing! Happy publishing. /:
define( 'WP_DEBUG', true );
define( 'WP_DEBUG_LOG', true );
define( 'WP_DEBUG_DISPLAY', false );
@ini_set( 'display_errors', 0 );
This enables WordPress debug mode, writes errors to wp-content/debug.log, and keeps stack traces off public pages. Reproduce the failure once, then open the log and look for the newest PHP Fatal error, plugin path, theme path, filename, and line number. The WordPress Developer Debugging Handbook documents the constants and safe logging approach.
Do not leave verbose debugging enabled forever on a busy production site. After collecting evidence, download the log, remove sensitive details if sharing it, and return the constants to their previous values when troubleshooting is complete.
Non-Destructive Plugin Deactivation via SFTP or File Manager
If the dashboard is inaccessible, go to /wp-content/ and rename plugins to plugins_deactivated. Test the homepage and login. Renaming the directory disables active plugins without deleting their files, database tables, or settings. If the site recovers, rename the folder back to plugins, then reactivate extensions one at a time until the conflict returns.
For a live site, do this during a low-traffic period and keep the snapshot ready. If the change does not help, restore the original folder name before testing the theme. Never confuse temporary isolation with permanent removal.
Using Health Check and Troubleshooting Mode for Live Sites
The official WordPress.org Health Check & Troubleshooting plugin provides a safer administrator-only test. Troubleshooting Mode disables plugins and switches to a default theme only for your logged-in session; normal visitors continue to see the public site with its existing configuration.
Use the mode to test the theme and extensions one by one. This avoids interrupting customer browsing and is especially useful when the problem appears only for administrators. If you need community input, include the error text, WordPress version, PHP version, recent changes, and steps already tested in the WordPress Support troubleshooting forum.
Before testing, make a short incident record. Write down the URL, affected user type, browser, HTTP status, last successful visit, last successful order, and every change made in the previous hour. Keep a copy of the first log entry and the latest log entry. This prevents circular troubleshooting, where a new cache purge or update is mistaken for the cause of the original failure.
If the log names a file in a child theme, do not immediately replace the whole theme. First compare the failing template with the parent version and check whether a recent Core or PHP change exposed an old function. If the log names an extension, check its documented PHP and WordPress requirements, then test the newest compatible release on staging. A safe staging backup should include both the database and uploads; a staging copy without recent orders is not a substitute for a live snapshot.
Caching adds another layer of confusion. Clear the page cache only after recording the response, then purge the object cache and CDN separately if needed. A cached 200 response can hide a current server error, while a cached error can make a repaired site appear broken. Test in a private browser window and from cellular data after each meaningful change.
Resolving the Top Seven Most Destructive WordPress Errors
The right fix depends on the layer named in the evidence. Make one change, test, and record the result. If the error returns after a rollback or appears across multiple sites on the same host, escalate to hosting support.
| Error or symptom | Likely root cause | First file or area | Typical first action | Resolution time |
|---|---|---|---|---|
| White screen or critical error | Fatal PHP error or plugin collision | debug.log, wp-content/plugins | Isolate named extension | 10–30 minutes |
| 500 Internal Server Error | Broken .htaccess, PHP crash, timeout | Site root and server log | Replace with clean rules; review logs | 10–45 minutes |
| Database connection error | Wrong credentials or unavailable MySQL | wp-config.php, host status | Verify four DB constants | 15–60 minutes |
| Allowed memory exhausted | PHP or WordPress memory ceiling | wp-config.php, .user.ini | Raise limit and identify heavy code | 15–45 minutes |
| Stuck maintenance screen | Aborted update left .maintenance | Site root | Delete the flag after backup | 5 minutes |
| 403 Forbidden | Permissions or deny rule | Filesystem and .htaccess | Check 755, 644, and rules | 15–60 minutes |
| Broken WooCommerce flow | Gateway JS, template, session conflict | Checkout, browser console, logs | Test extensions and templates | 30–120 minutes |
White Screen of Death (WSOD) and Critical PHP Fatal Errors
The White Screen of Death is commonly a PHP fatal error whose details are suppressed from the public page. If the message says “There has been a critical error on this website,” use Recovery Mode or inspect debug.log for the component and line. Rename only the named plugin first; if no component is named, isolate all plugins and restore them individually.
Do not edit WordPress Core files to hide the symptom. After the site returns, update or replace the incompatible extension, check its PHP requirements, and test the affected page. For a deeper white screen of death fix, see WordPress White Screen of Death: Safe Fixes for a Blank Site.
If the fatal error occurs only on one URL, compare that request with a working page. A page-builder template, shortcode, or custom query may be using more memory than the rest of the site. If both the front end and dashboard are blank, use file access rather than repeated login attempts. If Recovery Mode is available, copy the error details into the incident record before closing the session.
500 Internal Server Error and Corrupted Configuration Files
A 500 internal server error in WordPress can come from invalid .htaccess syntax, a PHP crash, or a host timeout. Download the existing .htaccess first, rename it, and create a clean default file in the WordPress root:
# BEGIN WordPress
<IfModule mod_rewrite.c>
RewriteEngine On
RewriteBase /
RewriteRule ^index\.php$ - [L]
RewriteCond %{REQUEST_FILENAME} !-f
RewriteCond %{REQUEST_FILENAME} !-d
RewriteRule . /index.php [L]
</IfModule>
# END WordPress
The Apache .htaccess guide explains how per-directory configuration is processed. If a clean file does not help, inspect the host’s PHP and error logs for execution timeouts or a broken extension. See WordPress 500 Internal Server Error: Safe Fixes for Your Site for the full recovery path.
Error Establishing a Database Connection
This message means PHP cannot communicate with MySQL. In wp-config.php, verify DBNAME, DBUSER, DBPASSWORD, and DBHOST against the host’s current values. Check whether the database server is down before changing credentials, and never paste passwords into a public support thread.
If credentials are correct and you have a backup, add this temporary directive to wp-config.php:
define( 'WP_ALLOW_REPAIR', true );Visit /wp-admin/maint/repair.php, run the repair, then remove the directive immediately. It permits access without normal authentication, so leaving it active is a security risk. For a complete Error Establishing a Database Connection in WordPress: Safe Fixes, include host status and database logs in your escalation.
Do not confuse a database connection failure with a damaged table. A wrong password, changed database host, exhausted connection pool, or temporarily unavailable MySQL service can produce the same public message. Ask the host whether the database server is accepting connections and whether account privileges changed. Repair tables only after those checks and only from a verified export.
Fatal Error: Allowed Memory Size Exhausted
Page builders such as Elementor and Divi, image processing, and WooCommerce can exceed a 64M or 128M PHP allocation. First check the actual PHP limit in the hosting panel. Then, if your host permits it, place this in wp-config.php above the stop-editing comment:
define( 'WP_MEMORY_LIMIT', '256M' );If PHP still reports exhaustion, ask the host to raise the server limit in .user.ini or php.ini, and identify the code using the most memory. Raising the ceiling alone does not fix an infinite loop or a leaking extension. The PHP memory limit documentation explains the server-level boundary.
Stuck in Maintenance Mode After an Aborted Update
If the page says “Briefly unavailable for scheduled maintenance,” connect to the site root using SFTP or cPanel File Manager. Download a copy, reveal hidden files, and delete .maintenance. WordPress normally removes this flag when an update finishes; a timeout or interrupted request can leave it behind.
Run updates one at a time after recovery and confirm that the PHP process has enough execution time. Do not delete unrelated hidden files.
403 Forbidden Errors and Corrupt File Permissions
A 403 can result from a security rule, directory restriction, or incorrect permissions. As a general baseline, folders use 755, files use 644, and sensitive wp-config.php files may use 600 or 640 when supported by the host. Verify ownership and group settings before applying recursive changes.
Inspect .htaccess for deny rules and check whether Wordfence, Sucuri, a CDN, or the host firewall blocked the request. “Directory index forbidden” can simply mean the requested directory has no index file. Change only the affected rule, then test from a separate network.
WooCommerce Checkout and Broken Customer Flow Glitches
When WooCommerce checkout is not working, protect revenue first: record the failing step, test a small order in a safe environment, and check the browser console for JavaScript errors. Payment gateway scripts can conflict with optimization tools, themes, or another extension. A child-theme template override can also fall behind WooCommerce Core.
Use Health Check or staging to disable non-essential extensions, then test the gateway, cart, coupons, and confirmation email in sequence. Review session transients and server logs, but do not delete order data casually. The Common WordPress Errors: Safe Fixes for Beginners guide covers related conflicts.
After a checkout repair, test more than the payment button. Confirm tax and shipping calculations, stock reduction, the order status, the customer receipt, the admin notification, refund access, and the thank-you page. Check the gateway’s webhook or callback log as well. A front-end success message without a settled payment can create a second business problem, so use the gateway’s test mode or a low-value controlled transaction.
When to Hire an Expert vs. Fixing It Yourself: The Economic Decision Matrix
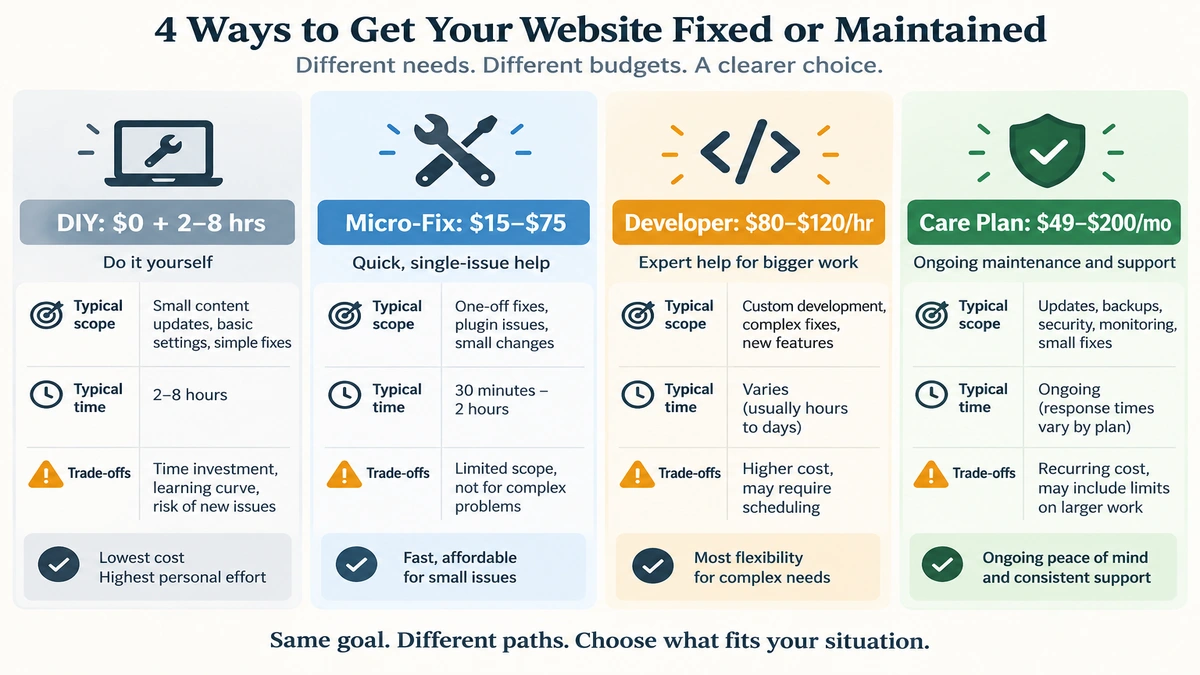
DIY is sensible when the site has a current backup, the symptom is isolated, and the change is reversible. It is risky when revenue, customer data, custom code, or a production database is involved. A wordpress bug fix service cost should be compared with downtime and the value of your own time, not with pride in solving the problem alone.
| Option | Typical benchmark | Best fit | Main trade-off |
|---|---|---|---|
| DIY | $0 cash + 2–8 hours | Low-risk, documented issue with backup | Time, uncertainty, regression risk |
| Productized micro-fix | Fluxpress $15–$60; Fixed.net $75 one-off | One visible error with a clear scope | Limited for bespoke architecture |
| Monthly care | Fixed.net $49/mo; agencies commonly $49–$200/mo | Updates, monitoring, recurring help | Ongoing commitment |
| Vetted developer | Codeable $80–$120/hr | Custom PHP, database, or WooCommerce work | Hourly scope can expand |
| Boutique agency | Often $150+/hr | Complex systems and high business stakes | Highest cost, deeper discovery |
Downtime ROI: avoided loss = hourly revenue × outage hours. If a store averages $500 per day, four hours of checkout downtime is roughly $83 in direct daily revenue before counting abandoned carts, support time, and trust.
Use that table as a screening tool, not a promise of a fixed final invoice. A provider should state whether the quote includes diagnosis, backup, staging, implementation, cache purge, testing, and a warranty. Ask whether emergency work is billed at a premium and whether access credentials can be revoked after delivery. The cheapest quote is not economical if it leaves undocumented changes or a recurring conflict behind.
For a non-commercial blog, a one-time repair may be enough. For a store, membership site, or lead-generation business, prevention often wins because backups, uptime monitoring, update testing, and a response path reduce the next incident’s duration. Calculate both the expected cost of an outage and the cost of keeping the environment maintained.
The Hidden Costs of Extended DIY Troubleshooting
Six hours spent reading forums is not free if the owner’s productive time is worth $50 per hour. That is $300 in opportunity cost to avoid a $15 or $30 micro-fix. Persistent 500 responses can also reduce crawl reliability, while paid ads may continue sending visitors to a broken landing page.
The technical cost can be higher: editing core files creates regression risk, experimenting directly on database tables can damage options, and repeated cache purges can obscure whether a fix worked. Stop when evidence is unclear, a backup cannot be verified, checkout is affected, or the issue involves custom code and a live database.
Vetted Service Options: Micro-Fixes, Retainers, and Freelance Platforms
Productized services are efficient for a defined one-time WordPress fix. Fixed.net advertises a $75 one-off benchmark and a $49 monthly care option; Fluxpress lists micro-fix tiers from $15 to $60. Confirm scope, warranty, response time, access requirements, and whether a backup is taken before work begins.
For bespoke code, a vetted developer network such as Codeable may charge $80–$120 per hour. A retainer makes sense when the business needs updates, backups, monitoring, and incident response rather than a single repair. For provider selection, see the upcoming Outsource WordPress Maintenance: The Strategic 2026 Guide to Costs, Scope, and Provider Selection.
The Self-Hosted Reality Check: Why WordPress Breaks More Than Closed SaaS
WordPress bugs are the operational price of an open, modular system. In self-hosted WordPress.org, the owner controls the server, PHP runtime, MySQL database, theme, plugins, and data. Those components come from different teams and release on different schedules, so compatibility is the owner’s responsibility.
Squarespace uses a closed SaaS, multi-tenant architecture. One provider controls hosting, code execution, security, and platform updates. That reduces plugin conflicts and server maintenance, but it also narrows customization, portability, and direct infrastructure control. The right choice depends on whether freedom or convenience matters more; our Squarespace vs. WordPress: The Definitive 2026 Comparison Guide provides the broader decision context.
| Dimension | Self-hosted WordPress | Closed SaaS such as Squarespace |
|---|---|---|
| Code model | Open-source, modular PHP/MySQL stack | Provider-controlled platform |
| Customization | Themes, plugins, server code, database access | Approved features inside a walled garden |
| Maintenance | Owner manages updates, backups, compatibility, and hosting | Provider manages the platform layer |
| Failure surface | Plugin, theme, PHP, database, cache, and server interactions | Fewer user-managed dependencies |
| Ownership | Direct access to files and database | Data and export options depend on platform rules |
Open-Source Freedom vs. Managed SaaS Maintenance
WordPress gives you the keys. You can scale infrastructure, write custom integrations, move hosts, and own the database. The same control means you must test updates, maintain backups, and resolve conflicts. Squarespace centralizes those duties and offers a smoother maintenance experience, but cannot expose the same level of server or code control.
Building a Proactive Maintenance Routine to Eliminate Future Bugs
Use four habits to make self-hosted WordPress feel closer to a managed platform:
- Run automated off-site cloud backups and periodically restore-test them.
- Test major plugin and theme updates on staging before production.
- Keep plugin hygiene strict: remove abandoned tools and keep the active set deliberately small, often under 20–30 where practical.
- Use high-performance managed WordPress hosting with current PHP, monitoring, and support.
Follow a safe WordPress update checklist and record what changed. Prevention is cheaper than an emergency bug fix.
Frequently Asked Questions About WordPress Bug Fixing
How Do I Fix a Broken WordPress Site for Free?
You can often complete a free WordPress bug fix with WP_DEBUG, SFTP or cPanel, a plugin-folder rename, a PHP memory adjustment, and the free WordPress.org Support Forum. These tools cost nothing, but hosting backups, professional time, and lost revenue may still have a cost.
Is WordPress Outdated or Having Core Issues in 2026?
WordPress is not outdated; it powers more than 43% of the web and continues to receive security and performance updates through the Gutenberg project. Most failures come from plugin collisions, outdated custom code, PHP incompatibility, or weak hosting rather than the Core software itself.
How Much Does an Emergency WordPress Bug Fix Typically Cost?
Specialized micro-fix services commonly benchmark one-off resolutions at $15–$75, sometimes with a warranty. Vetted developers such as Codeable may charge $80–$120 per hour for complex work, while agency or care retainers commonly range from $49–$200 per month. Confirm scope and billing terms before sharing access.
Can Fixing One WordPress Bug Cause New Problems Elsewhere?
Yes. Editing Core files or applying a quick override can create regression errors, and a database change can affect unrelated features. Take a snapshot first, reproduce the issue on staging where possible, test forms and checkout after the fix, and keep a rollback path before deploying to live.