

If you searched for avoid an excessive dom size wordpress elementor, you probably saw an amber or red PageSpeed Insights warning after building a page that looks perfectly simple. The problem is usually not the design itself. It is the number of HTML wrappers Elementor sends to the browser, and the depth and repetition of those wrappers. If you are building a broader performance plan, start with the complete Core Web Vitals guide before tuning this specific audit.
The browser mechanics matter, but you do not need a computer-science degree to fix the warning. The practical route is straightforward: measure the page in Chrome DevTools, enable Elementor’s native performance features, convert legacy Sections to Flexbox Containers, remove high-node widgets and duplicate responsive content, and lazy-render suitable below-the-fold sections. Make those changes on a backup or staging copy first.
Quick Answer: To fix “Avoid an excessive DOM size” in Elementor, measure the live node count, enable Optimized DOM Output and Improved Asset Loading, convert nested Sections and Columns to Flexbox Containers, prune heavy widgets and unpaginated loops, and defer suitable below-the-fold containers with Perfmatters Lazy Elements. Caching plugins and CSS
display: nonedo not delete DOM nodes.
Understanding the Document Object Model and Google Lighthouse Warning Limits
The Document Object Model, or DOM, is the browser’s in-memory tree of the HTML document. It is not the same as the HTML file’s compressed byte size. A small-looking page can create a large DOM if the builder wraps each visual element in several containers. That tree consumes memory, participates in style calculation, and must be traversed when the browser lays out or updates the page.
Google Lighthouse’s “Avoid an excessive DOM size” audit uses practical warning limits rather than declaring that one number makes every site unusable. Treat the thresholds as a budget. Staying comfortably below the warning range gives low-powered mobile devices more room for menus, forms, animations, and third-party scripts.
What is the DOM Tree and How Do Nodes Multiply
A useful mental model is a family tree. The document contains the root HTML element, which contains head and body, which in turn contain parents and children. Every element such as <div>, <section>, <p>, <span>, and <img> becomes a node after parsing. Text nodes and some other objects can add to the browser’s workload too.
An Elementor sentence may be wrapped by a Section, Column, Column Wrapper, Widget Container, Text Editor widget, and paragraph element. The reader sees one sentence; the browser sees a chain of distinct elements. Repeat that chain across a header, hero, cards, testimonials, pricing table, footer, and mobile duplicate, and visual simplicity quickly becomes thousands of nodes.
This is why reducing DOM nodes is different from reducing image bytes. WebP images, Brotli, and caching can improve delivery, but they cannot turn six nested elements into one. The lasting fix is to remove unnecessary structure or delay markup that does not need to exist during the initial view.
Google Lighthouse Thresholds and Audit Scoring Rules
Lighthouse reports the following practical limits for Audit 24:
| Metric | Green pass | Amber warning | Red failure | What to inspect |
|---|---|---|---|---|
| Total DOM nodes | 0–799 | 800–1,399 | 1,400+ | Repeated sections, widget wrappers, loops |
| Maximum DOM depth | 32 or fewer | — | More than 32 | Inner Sections and deeply nested containers |
| Maximum children on one parent | 60 or fewer | — | More than 60 | Mega menus, loops, long lists |
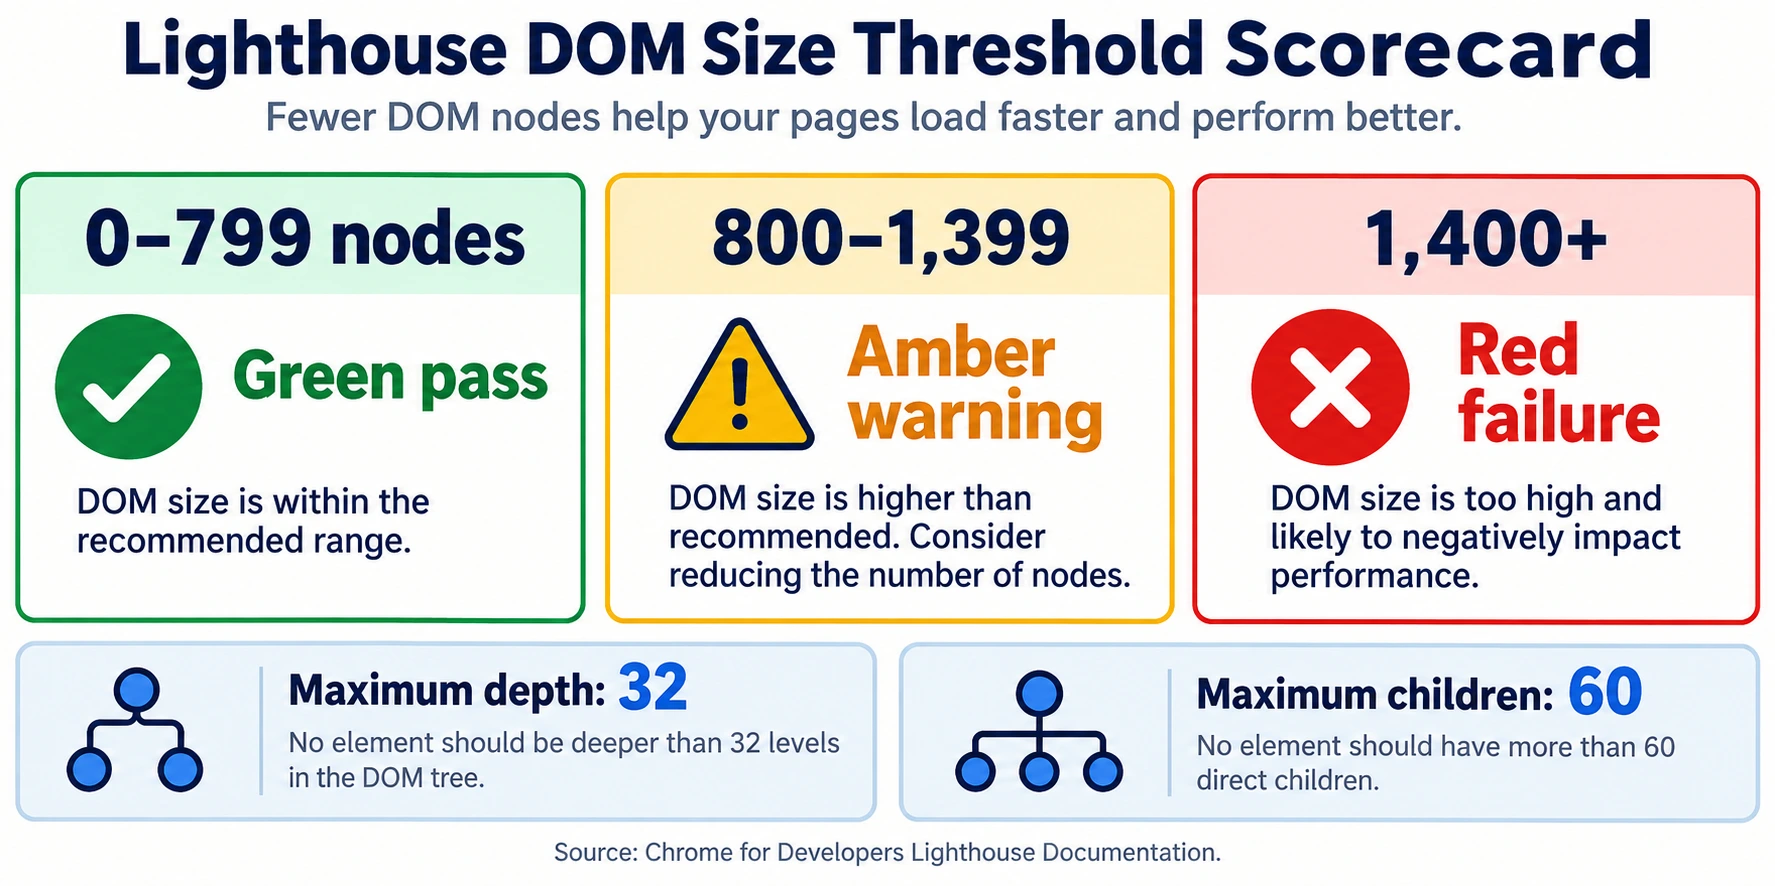
A three-column scorecard showing green pass, amber warning, and red failure ranges with the depth and child-node limits.
The familiar 800-node warning is a signal to investigate, not a guarantee that a page crashes at node 801. The risk rises with CSS complexity, JavaScript, images, fonts, and the user’s device. A page with 1,300 lightweight nodes can behave differently from a page with 1,300 animated widgets. Nonetheless, the audit gives you a useful, reproducible budget: aim below 800 and preferably closer to 500–750 for standard pages.
Why an Excessive DOM Size Degrades INP, TBT, and Mobile Rendering
Once HTML has been parsed, the browser still has to calculate styles, build layout information, paint pixels, and respond to interactions. Click a menu, open an accordion, focus a form field, or trigger an animation, and some of that work may have to run again across the tree. The larger the tree, the more noticeable the delay can become, particularly alongside complex selectors or third-party scripts.
The practical result is longer main-thread tasks, more layout reflows, and worse Total Blocking Time (TBT). It can also raise Interaction to Next Paint (INP), the time between an interaction and the next visual response. See Google’s INP guidance for the broader interaction metric. Browser work varies by engine and page, so do not treat O(N log N) to O(N^2) as a universal timing formula; use it as an engineering explanation for why extra nodes can compound recalculation cost. Test on mobile emulation and real users rather than relying on desktop alone.
The Caching and Responsive Display None Misconception
Caching is valuable, but it solves a different problem. A page cache can serve already-generated HTML faster. GZIP or Brotli can shrink the transfer. Minification can remove whitespace and comments. None of those actions necessarily removes the elements that Chrome creates when it parses the response. If you are choosing between performance plugins, compare their actual jobs in a lightweight DOM optimization plugin evaluation rather than expecting cache settings to rewrite Elementor markup.
The same distinction explains Elementor’s responsive visibility controls. An element hidden with CSS display: none is not painted, but it remains in the DOM. If a desktop header and a mobile header are both present in the HTML, hiding one does not remove its nodes from the mobile audit.
| Technique | What it improves | Does it remove parsed DOM nodes? | Correct use |
|---|---|---|---|
| Page caching | Server response time and origin load | No | Keep it for TTFB and repeat visits |
| HTML minification | Transfer bytes and parsing whitespace | No | Use it alongside structural cleanup |
display: none / Hide on Mobile | Painting and visual presentation | No | Use for small state changes, not DOM reduction |
| Delete duplicate markup | HTML structure and browser work | Yes | Prefer one responsive component |
| Flexbox Container migration | Wrapper depth and repeated layout elements | Yes, where wrappers are removed | Use on staged copies first |
| Lazy Elements | Initial DOM and above-the-fold work | Defers selected markup | Reserve for below-the-fold content |
Why Caching and Minification Plugins Cannot Reduce DOM Nodes
Suppose an Elementor page produces 2,000 elements. Minifying its HTML can place most of that markup on one long line, but Chrome still parses the same opening tags and creates the same 2,000-element tree. A cache plugin can deliver that line more quickly; it cannot infer which wrappers are safe to delete without changing the page.
That does not make a cache plugin useless. Leave caching, compression, CDN delivery, and script optimization in place for their own jobs, then measure DOM size separately. The repair belongs in the source layout, widget selection, or conditional rendering strategy.
The Responsive Visibility Trap: Why Hiding Elements on Mobile Fails Audits
The most common trap is building a desktop header, a mobile header, a desktop hero, or two versions of a section, then hiding each version at a breakpoint. Both versions can still be downloaded and parsed. The browser may skip painting one, but the audit can count both. A duplicated navigation can therefore add hundreds of nodes before the main content begins.
Inspect the Elements panel with mobile emulation enabled. If the hidden section is still present, it is still part of the payload. Replace duplicated structures with one responsive container whenever possible. If a component truly must differ, render only the necessary variant at the server or application layer, or accept that it remains part of the page budget.
The Real Path to DOM Reduction: Structural Elimination vs Lazy Rendering
There are two honest paths. Permanent structural elimination removes wrappers, redundant widgets, duplicate mobile markup, and oversized loops from the page source. This is the best long-term choice for headers, reusable templates, and content users need immediately. Conditional lazy rendering defers below-the-fold chains until the user approaches them. It is useful for testimonials, pricing grids, and complex footers that are important but not needed for the first viewport.
The Five-Step Triage to Fix Excessive DOM Size in Elementor
Follow the steps in order. Measure first, make one controlled change at a time, then rerun the same audit. A staging copy and a page-level backup make rollback straightforward.
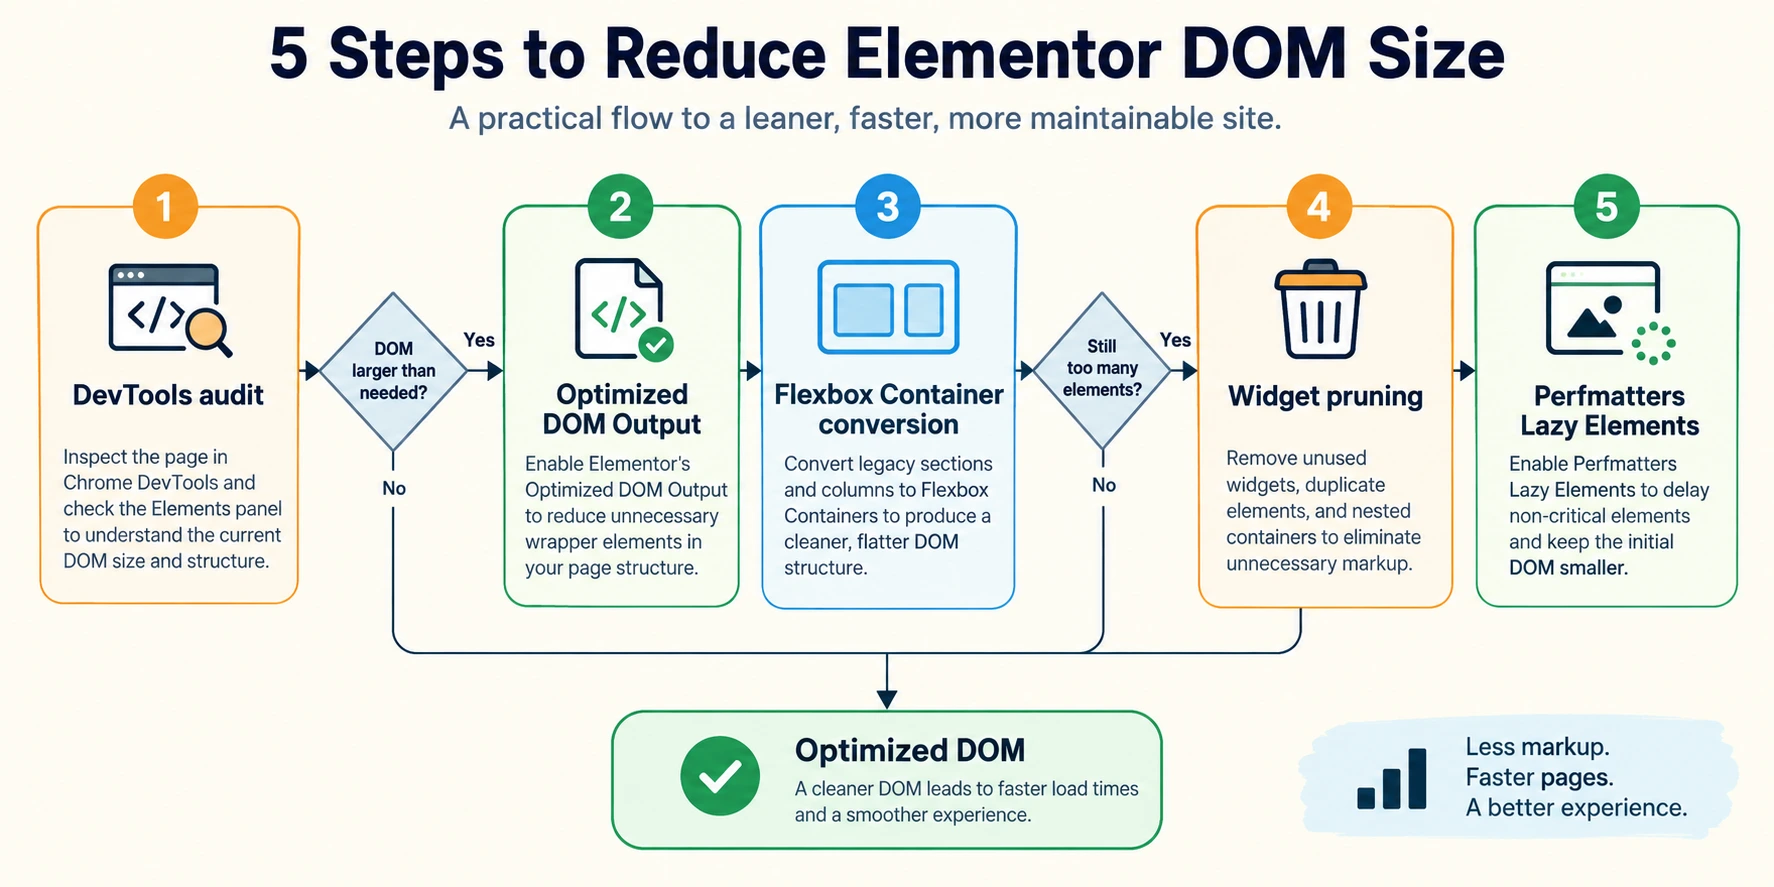
A linear flowchart showing DevTools audit → native Elementor settings → Flexbox Container conversion → widget pruning → below-the-fold lazy rendering.
Step One: Audit and Pinpoint Culprit Subtrees with Chrome DevTools
Start with the target page open in Chrome. Press F12, select Console, and run:
document.querySelectorAll('*').lengthThis gives a quick count of element nodes in the current document. It is not a replacement for Lighthouse, but it lets you compare before and after changes. Record the URL, viewport, logged-in state, and node count so the comparison is meaningful.
From there, open the Lighthouse panel, choose a mobile performance run, and inspect the “Avoid an excessive DOM size” diagnostic. Note total nodes, maximum depth, and the parent with the most children. In Elements, search for selectors such as .elementor-inner, .elementor-row, .elementor-column-wrap, .elementor-widget-wrap, or a suspicious loop wrapper. Hover over the node to highlight the corresponding page section.
Do not edit randomly. If the largest subtree is a mega menu, inspect it first. If depth is the issue, look for Inner Sections and nested containers. If total nodes are high but depth is reasonable, inspect carousels, icon packs, query loops, and repeated responsive sections.
Keep the experiment controlled. Use the same URL, browser profile, viewport, Lighthouse mode, and cookie state for every comparison. A logged-in editor view can contain toolbar markup that a public visitor never receives, while a consent banner, personalization layer, chat widget, or A/B testing script can add nodes to the public page. Record those conditions beside each measurement.
Step Two: Activate Elementor Optimized DOM Output and Asset Loading
In WordPress, open WP Admin → Elementor → Settings → Features. Set Optimized DOM Output to Active, Improved Asset Loading to Active, and Inline Font Icons to Active when those controls are available in your Elementor version. Elementor names and availability can change, so confirm the setting descriptions in your installation.
Together, these features reduce legacy output and unnecessary asset work. Optimized DOM Output can remove deprecated wrapper classes such as .elementor-inner, .elementor-row, and .elementor-column-wrap; Improved Asset Loading limits work that is not needed by the current page; inline icon handling avoids loading a complete icon font when only a small subset is used. Once the settings are active, clear page caches, regenerate Elementor CSS if prompted, and rerun the count. For the architectural background, see Elementor’s Flexbox Container documentation.
Elementor’s broader WordPress performance guidance is useful for the surrounding work, but keep its caching, image, and asset recommendations conceptually separate from this DOM-specific cleanup.
Enable one group of settings on staging first. Check the header, menus, forms, popups, and responsive breakpoints before promoting the change. If a legacy addon depends on an old wrapper selector, fix or replace that dependency rather than disabling every performance feature site-wide.
Step Three: Convert Legacy Sections and Columns to Lean Flexbox Containers
On older Elementor layouts, the usual chain is Section → Column → Column Wrap → Widget. A three-column feature card can accumulate roughly 18 wrapper divs in that pattern. Rebuild the same visual design with Flexbox Containers and you may need only about two primary containers for the structural job, an approximate 88% reduction in those wrappers. The exact total depends on widgets, theme markup, and addons, so verify the result in your own DOM.
| Layout approach | Typical structural pattern | Example wrapper count | Performance implication |
|---|---|---|---|
| Legacy layout | Section → Column → Column Wrap → Widget | About 18 for a three-column card | More depth and repeated wrappers |
| Flexbox Container | Parent container → child content containers | About 2 primary containers | Shallower, easier-to-budget markup |
| Hybrid migration | Containers around still-legacy inner sections | Variable | Useful as an intermediate step; continue flattening |
Enable Flexbox Container in Elementor Features. On a staging copy, select a legacy Section in the editor and use Convert when Elementor offers it. Verify desktop, tablet, and mobile alignment; then replace Inner Sections with a container using Direction: Row, Flex Wrap, gap, alignment, and responsive controls. Remove the old section only after the converted layout matches the original. If a site needs a leaner builder strategy, this is also the point to compare clean DOM builders like Bricks and Breakdance. If a conversion causes a wider site issue, use WordPress emergency bug fixing and troubleshooting before changing more templates.
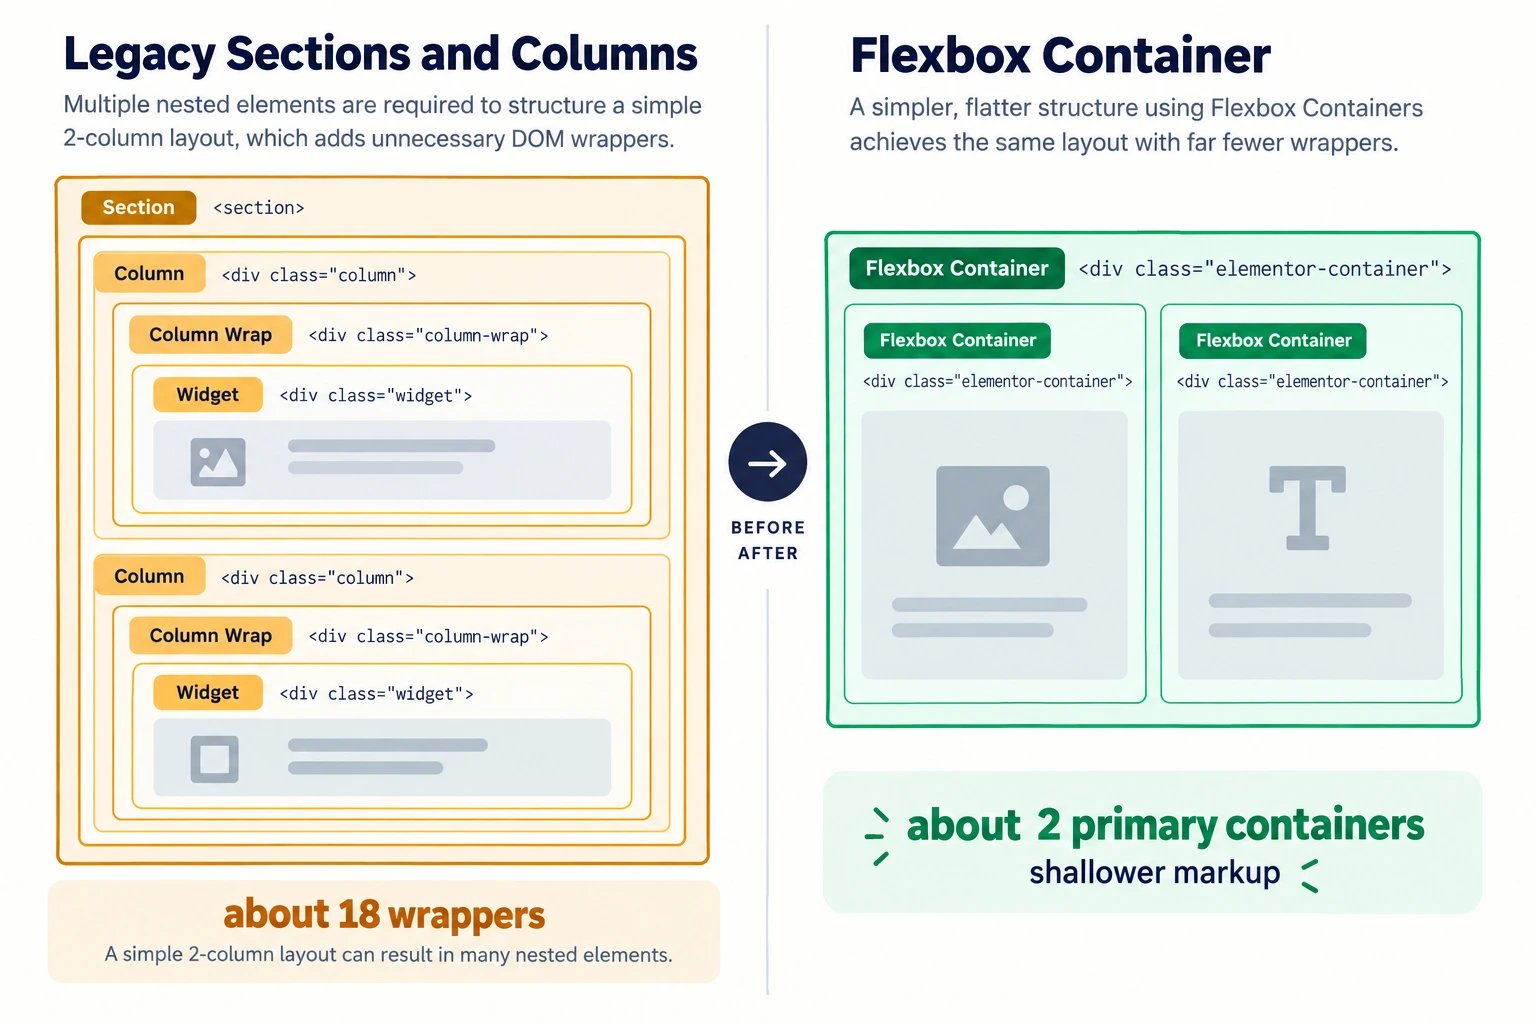
A side-by-side wireframe showing the legacy nested wrapper chain beside a shallow Flexbox Container structure, with node counts and eliminated wrapper labels.
Step Four: Prune Heavy Widgets, Icon Packs, and Unpaginated Query Loops
Audit the page for widget stacking. Four Spacer widgets often add unnecessary structure that padding or gap controls can replace. Mega-menu addons, animated headlines, tabs, carousels, icon lists, and Loop Grids can add many descendants. Replace a complex widget with a simpler text, image, or native container when the interaction is not essential.
Use this benchmark as a prioritization guide, not as a universal promise. Count each widget in your own rendered page because addons and settings change output.
| Widget or pattern | Approximate node footprint | First cleanup question |
|---|---|---|
| Text Editor | 2–10 | Can typography and spacing live on one widget? |
| Static Image | About 2–8 | Is a wrapper or link unnecessary? |
| Icon Box | About 15–35 | Can text and an inline icon replace it? |
| Image Carousel | About 80–150 | Do users need a carousel instead of one image? |
| Tabs or accordion | About 40–100+ | Can fewer panels or native disclosure work? |
| Post Loop / product grid | About 50–350+ | Is the query paginated to 6–9 items? |
Limit blog, portfolio, or WooCommerce loops to the items users need initially. A page loading 30 products with all metadata, thumbnails, controls, and hidden states can multiply nodes quickly. Prefer 6–9 items with pagination or a deliberate “load more” interaction. Also inspect hidden menu items, duplicated footers, unused addon widgets, and icon libraries loaded globally. Keep media work separate from DOM work, but use the WordPress image optimization guide to reduce the bytes those widgets still have to deliver.
Step Five: Defer Below-the-Fold Containers Using Perfmatters Lazy Elements
Long landing pages often genuinely need testimonials, pricing tables, comparison grids, or a large footer. In that situation, Perfmatters Lazy Elements can defer the sections that do not matter to the first viewport. Install and test it on staging, open Settings → Perfmatters → Lazy Loading, enable Lazy Elements, and add a class such as .lazy-dom-container to the relevant below-the-fold Elementor containers.
Give each deferred area a sensible minimum height or reserved layout space so it does not jump when injected. Test keyboard navigation, anchor links, analytics, forms, sticky elements, and browsers without the expected Intersection Observer behavior. Lazy-render only content that can safely appear later; never defer the headline, primary navigation, first form, or content required for the first interaction.
This technique changes when markup enters the initial experience rather than deleting it permanently. Read the Perfmatters Lazy Elements documentation before applying the feature, then rerun Lighthouse with the same viewport and scroll position. Manually scroll through the page and confirm that deferred content appears correctly. Watch CLS as well as node count: a lower initial DOM is not a success if the layout shifts or the user loses content.
If a reduction appears unexpectedly large, inspect the source before celebrating. Some optimization layers can remove or defer markup only for a particular viewport, cache state, or visitor type. Confirm the public page in an incognito window, test the mobile breakpoint, and scroll through every lazy-rendered section. Verify forms, accordions, menus, WooCommerce filters, analytics events, and anchor links. A passing lab audit is valuable, but it must not come from hiding content or breaking the first interaction.
Advanced Elementor DOM Hygiene and Long-Term Maintenance
Choosing a Lightweight Theme Foundation Like Hello Elementor
The theme contributes markup before Elementor renders the content. Multipurpose themes may add wrappers for headers, sidebars, widget areas, breadcrumbs, and theme-specific controls. A lean foundation such as Hello Elementor, Astra, or GeneratePress can reduce baseline overhead, but compare the actual rendered DOM and required features before switching a live site.
Streamlining Global Font and Icon Loading to Prevent Extra HTML Wrappers
Most sites need fewer font weights and icon styles than their design system initially loads. Enable Elementor’s inline icon option when it is compatible with your site, remove unused icon libraries, and check that optimization does not break accessibility labels or fallback rendering. Fonts do not always add one DOM node per glyph, but they can add requests, CSS complexity, and render-blocking work that compounds a large tree. For script-related work outside this audit, follow the guide to delaying JavaScript execution safely.
Establishing Pre-Publishing DOM Node Budgets for Agency Teams
Add a node budget to your staging handoff:
- Run
document.querySelectorAll('*').lengthon each core template. - Aim below 750 nodes for landing pages and below 500 for blog posts where practical.
- Verify that desktop and mobile do not duplicate entire sections.
- Test Lighthouse on an emulated 4G mobile device and review INP/TBT-related findings.
Record the page, viewport, template version, and exceptions. A budget is a review trigger, not a reason to remove useful content blindly. If INP remains high after the DOM is under control, continue with troubleshooting Elementor INP metrics.
A useful worksheet has six columns: template or URL, total nodes, maximum depth, largest-child count, the change made, and any visual or functional regression. It shows whether a small node reduction actually improved the page and prevents teams from changing caching, images, CSS, and Elementor structure at the same time without knowing which change mattered.
Finally, distinguish a DOM warning from other performance audits. A smaller tree does not automatically fix slow server response, large images, render-blocking stylesheets, third-party JavaScript, or a poor font strategy. Container migration targets markup, caching targets delivery, image compression targets bytes, and script delay targets main-thread execution. For the broader optimization context, use how to speed up WordPress performance.
Every new section, addon, popup, and loop spends part of the same finite budget. Review the rendered page after major template changes, not just after a speed-plugin update. A short monthly DOM check can catch gradual wrapper accumulation before it becomes a red audit failure.
Frequently Asked Questions About Elementor DOM Size Optimization
How Many DOM Nodes Should an Elementor Page Have?
Aim for fewer than 800 total DOM nodes to stay below Lighthouse’s warning threshold. Pages from 800 to 1,399 nodes receive an advisory, and pages at 1,400 or more fail the audit. For responsive pages, a practical working target is about 500–750 nodes, while keeping depth at 32 or fewer and any parent below 60 children.
Does Upgrading to Elementor Pro Increase DOM Size?
Elementor Pro does not automatically make every page bloated. Advanced widgets such as Loop Grids, animated headlines, carousels, and mega menus can generate more descendants than basic text and image widgets. Use Pro selectively, build the layout with Flexbox Containers, paginate dynamic content, and measure the rendered page rather than judging the license.
Can I Safely Convert an Entire Live Site to Flexbox Containers?
Convert gradually on staging, not in one bulk operation on production. Elementor’s conversion tools can change flex alignment, gaps, widths, and responsive behavior. Back up the site, migrate a representative template, test desktop/tablet/mobile and forms, then promote batches after visual comparison. Keep the legacy layout until the converted version is verified.
Why Does My Elementor Mobile Score Fail While Desktop Passes?
Mobile tests use a slower simulated CPU and network, so parsing, style recalculation, and script work take longer. A desktop header hidden on mobile can still add nodes to the mobile DOM. Remove duplicated markup, reduce nested containers and heavy widgets, test with mobile emulation, and then verify the result with field data when available.
The practical order is simple: measure the actual tree, remove structural waste, and defer only what users do not need immediately.